• Skip to primary navigation
  • Skip to main content
  • Skip to primary sidebar

Coral + Co. logo

  • Sewing
    • Free Tutorials
    • Free Patterns
    • Accessories
    • Apparel
    • Baby Sewing
    • Beginner
    • Home Sewing
    • Kids
    • Minky Sewing Projects
    • Tips and Tricks
  • Quilting
    • Learn How To Quilt
    • Free Quilt Patterns
    • Quilt Blocks
    • Quilt Patterns
    • Quilt Alongs
    • Holiday
  • Crafts
    • Cricut
    • Holiday
    • Printables
  • Holiday
    • Valentines Day
    • Easter
    • Mother’s Day
    • Summer
    • Patriotic Sewing
    • Halloween
    • Christmas
  • FREEBIES
    • Coral + Co. Resource Library
  • Contact
  • Shop
  • Nav Social Menu

    • Bloglovin
    • Email
    • Facebook
    • Instagram
    • Pinterest
    • YouTube
You are here: Home / Sewing and Quilting Patterns and Tutorials

Island Hopping in the Greek Isles

Mar 6, 2017 · Leave a Comment


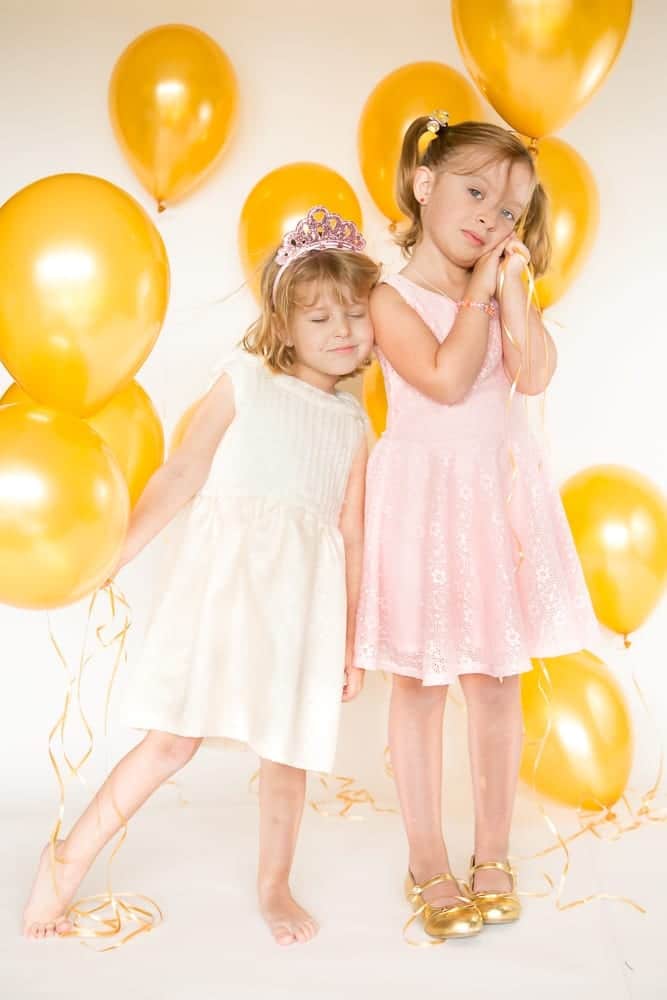
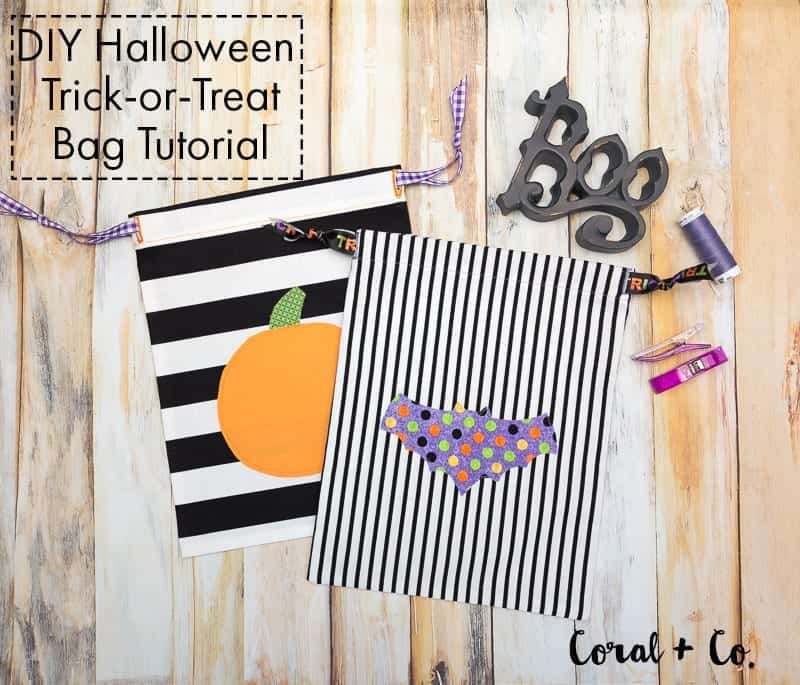
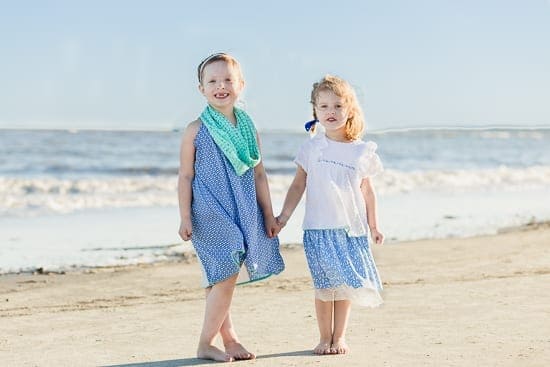
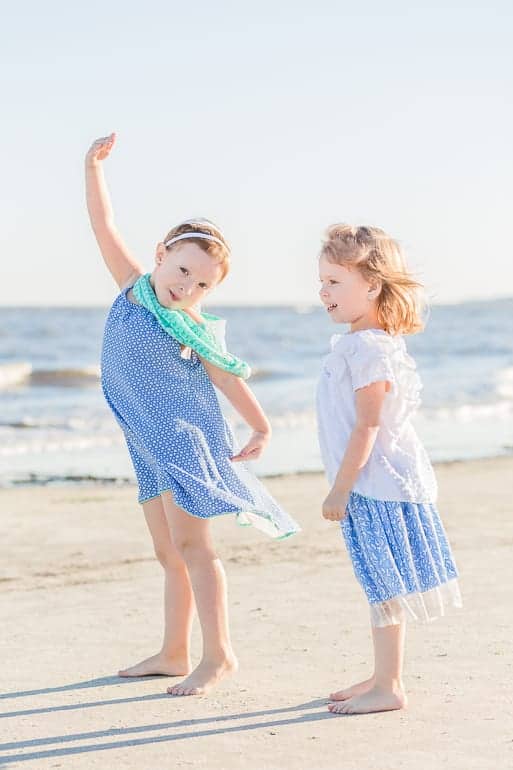
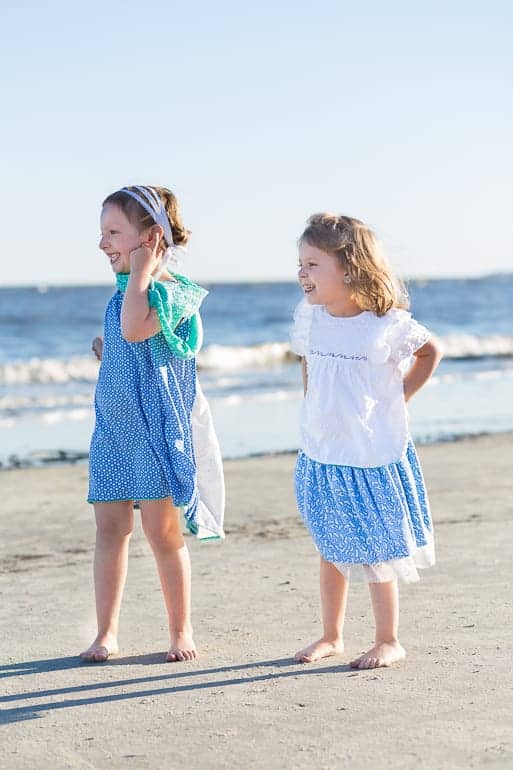
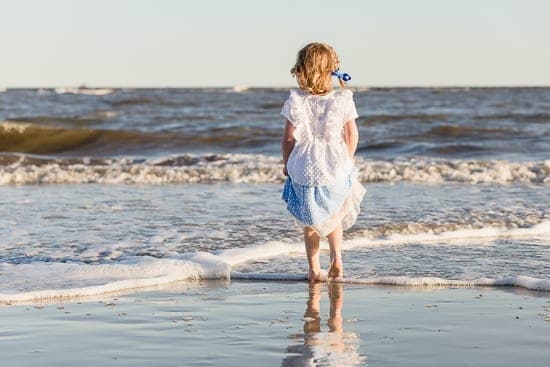
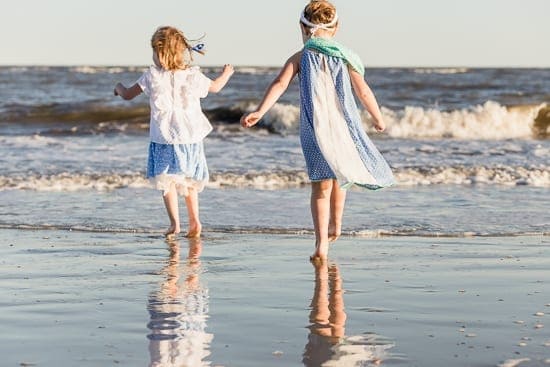
I absolutely loved this week’s theme to pick any place we wanted!  Since we live by the beach I knew we had to do something to do the with water.  And one of the places I have wanted to travel most is Greece.  I was inspired by the dreamy Mediterranean blues and greens and wanted to make flowing pieces that would be at home along the water.  You can vote for my look over at Project Run & Play!project-run-and-play-competitors

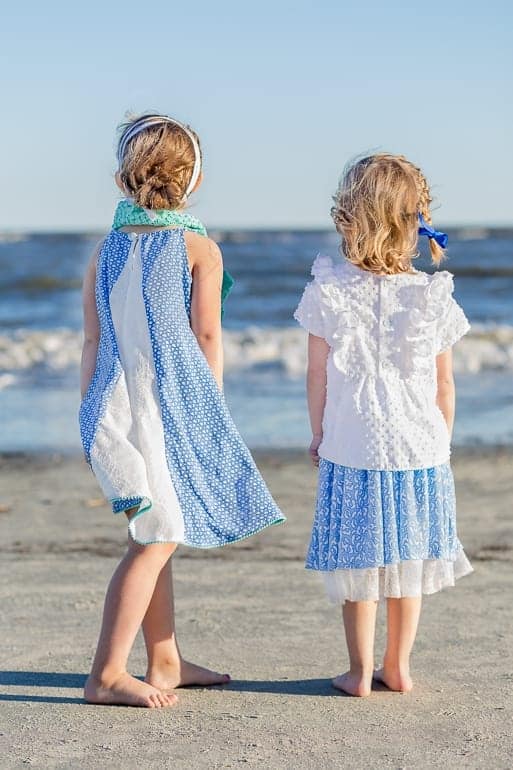
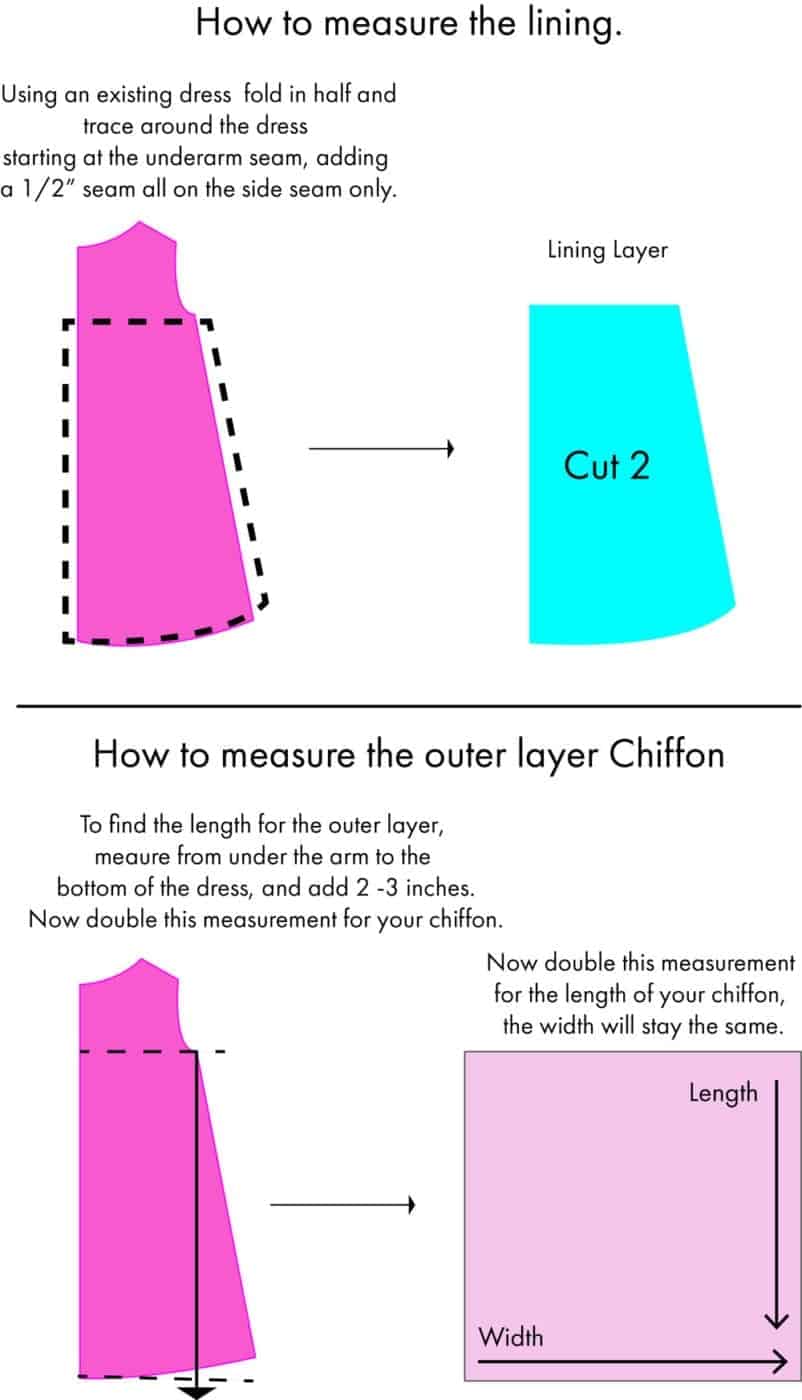
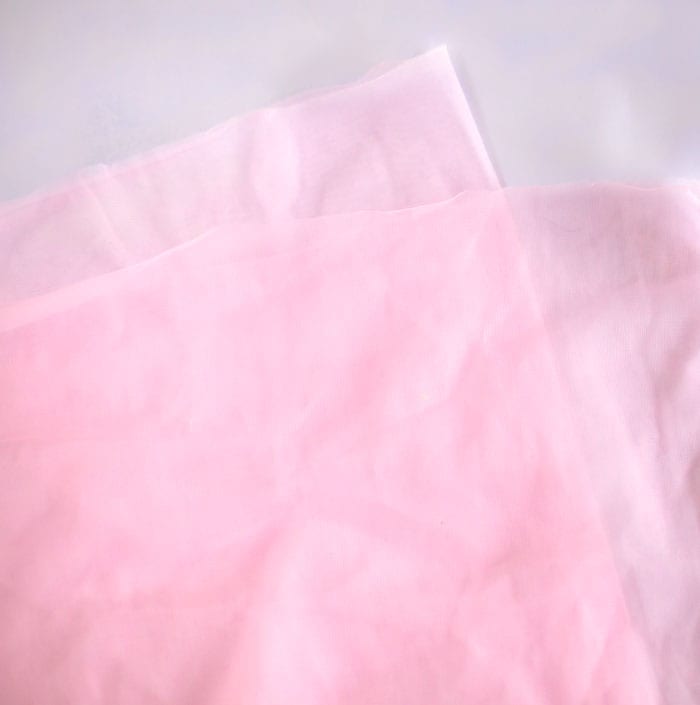
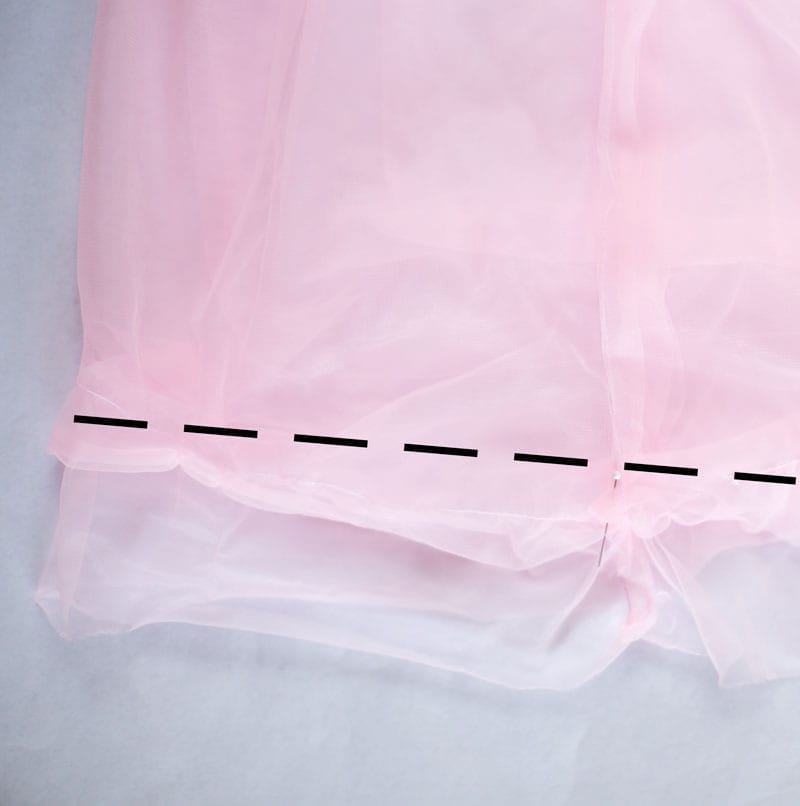
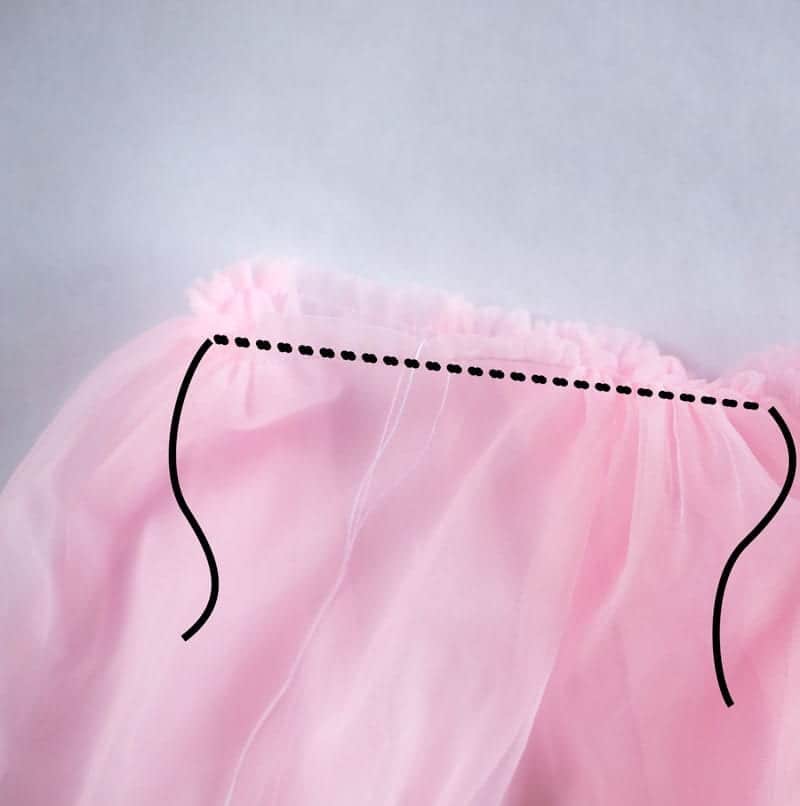
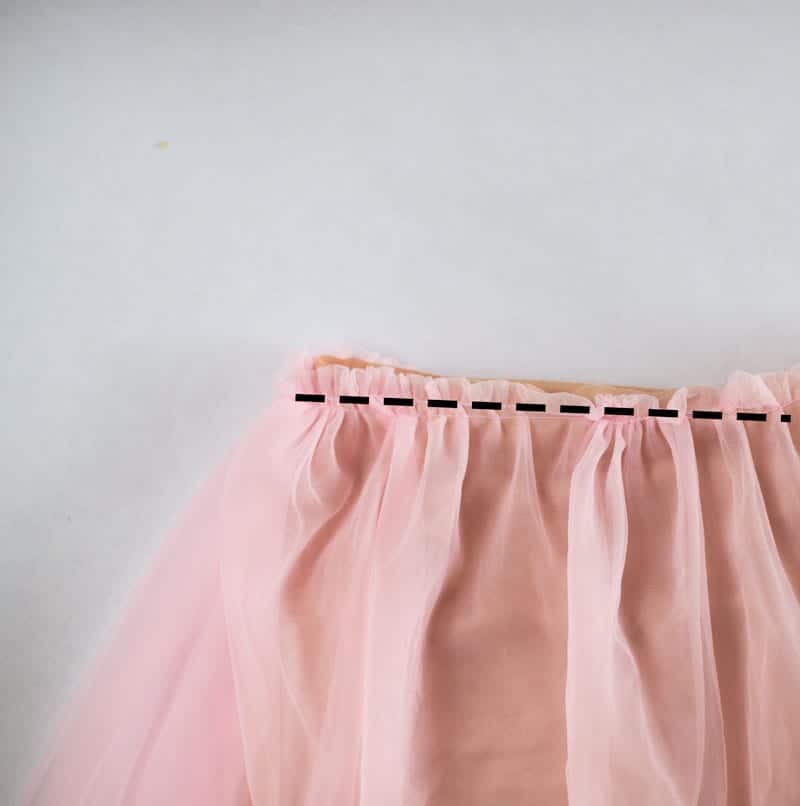
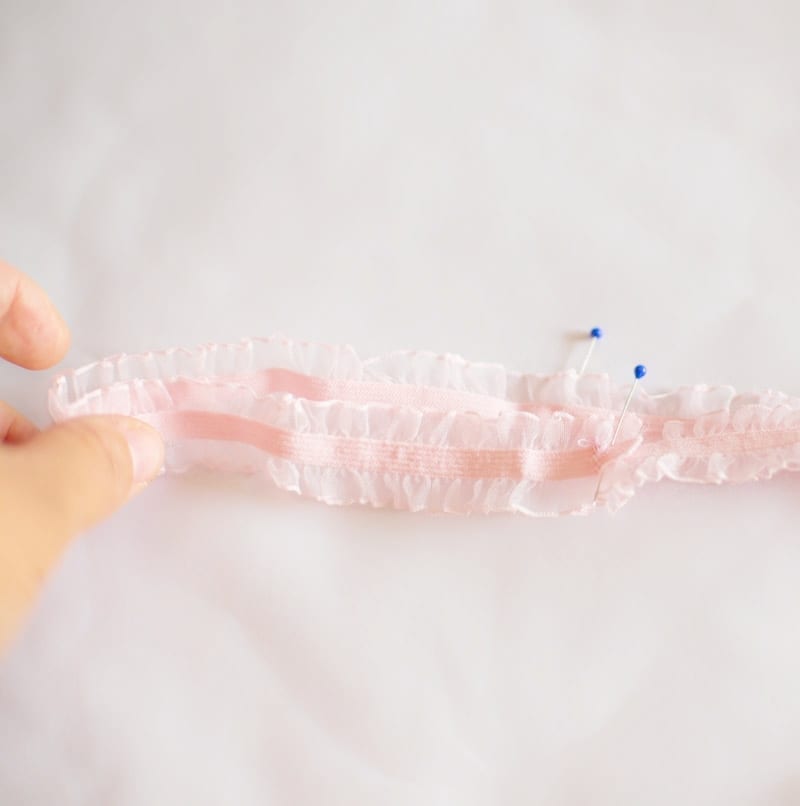
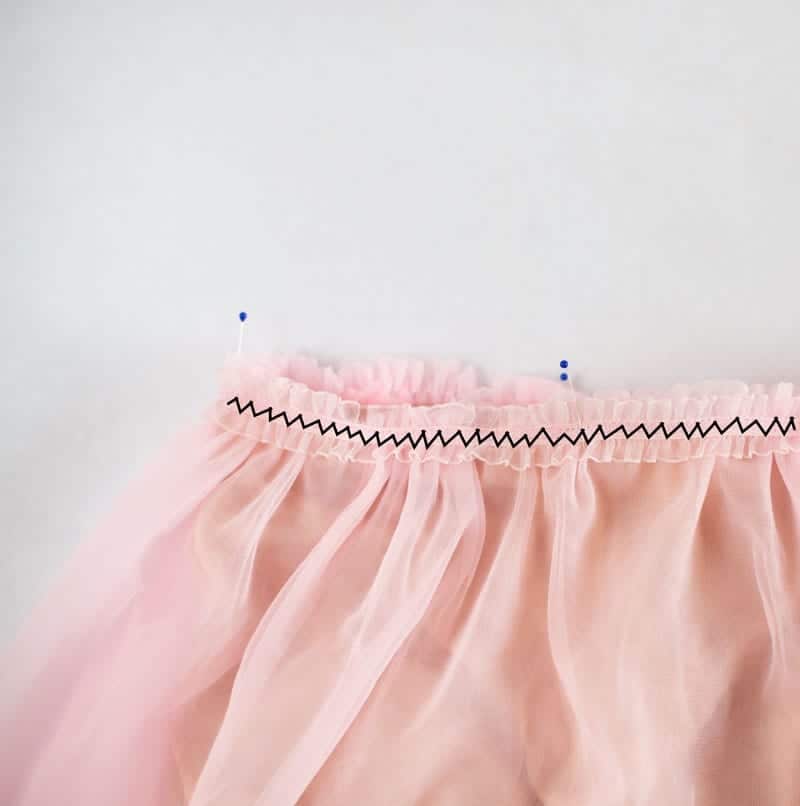
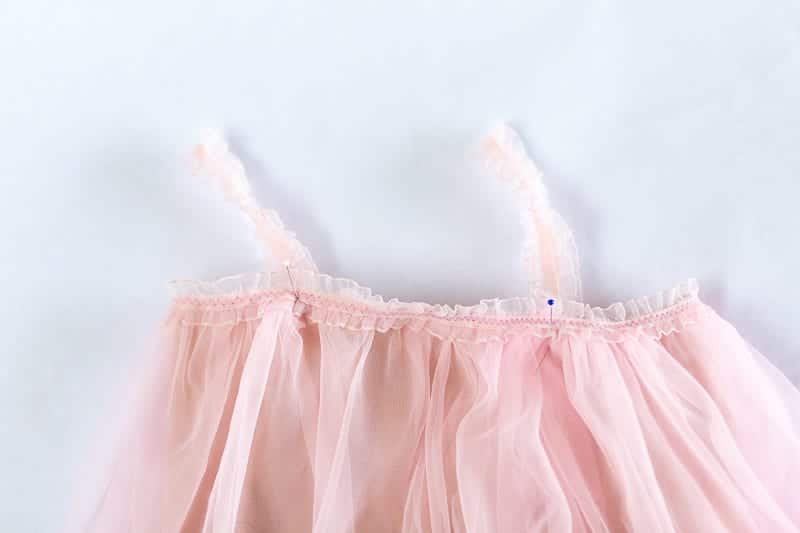
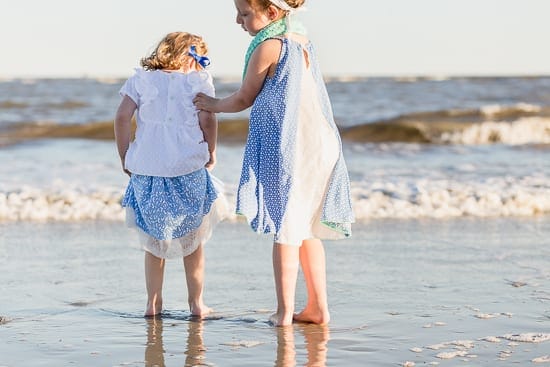
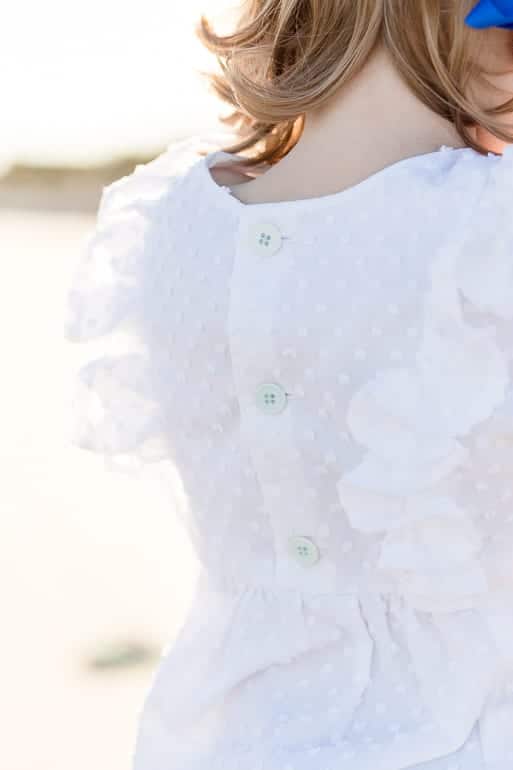
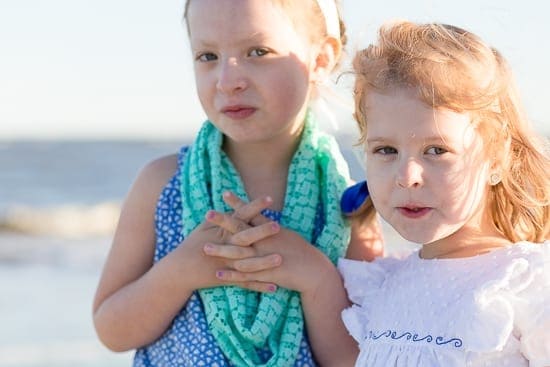
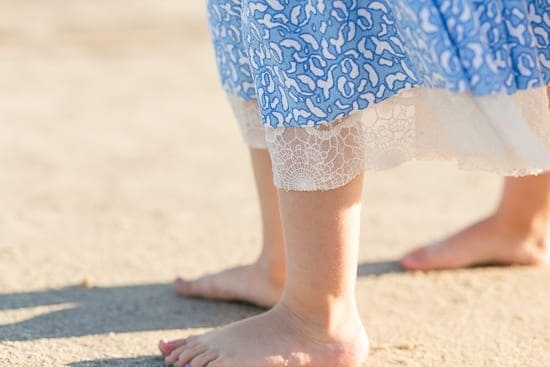
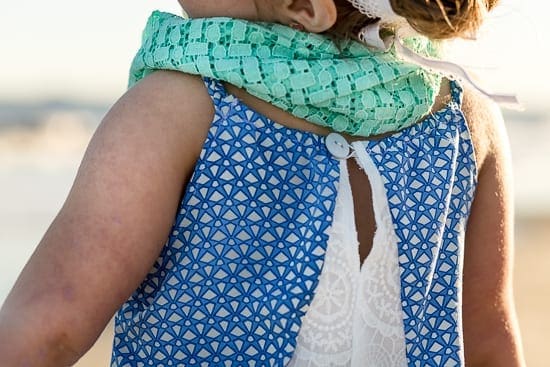
I used light flowy fabrics and paired them with classic shapes.  For the dress, I used the Cora dress bodice from Simple Life Pattern Company as a starting point to make a high low trapeze dress that is gathered at the neck with elastic and has braided straps, with an A-line lace cutout on the back.  I used the most amazing rayon poplin that seriously feels like butter.  I could use this fabric for gazillions of summer tops and dresses.  I lined the lace with a thin cotton lawn as well.  I also made an infinity scarf out of a minty crocheted lace.project-runt-and-play-greek-islaes

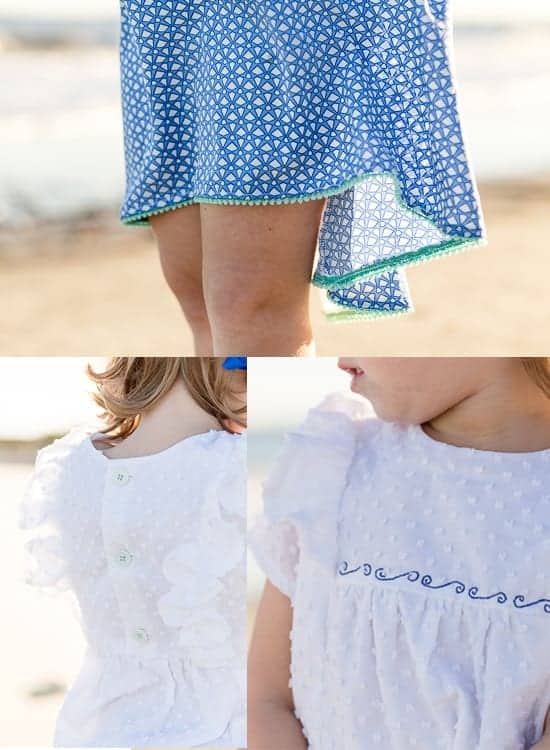
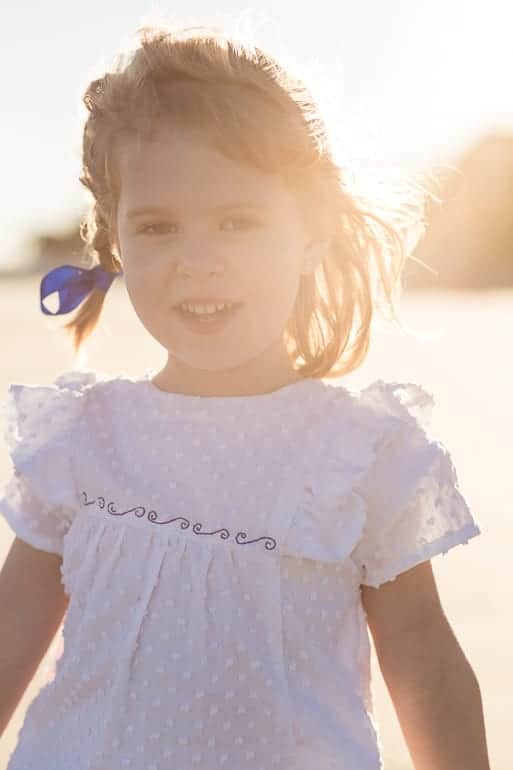
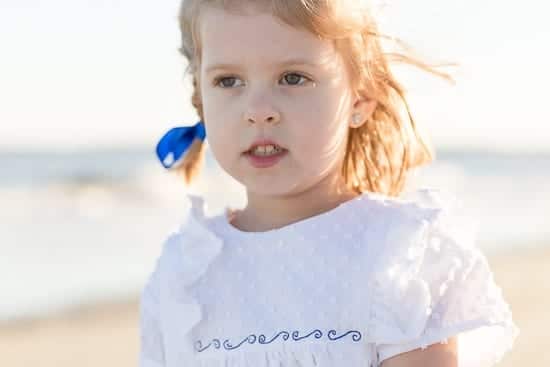
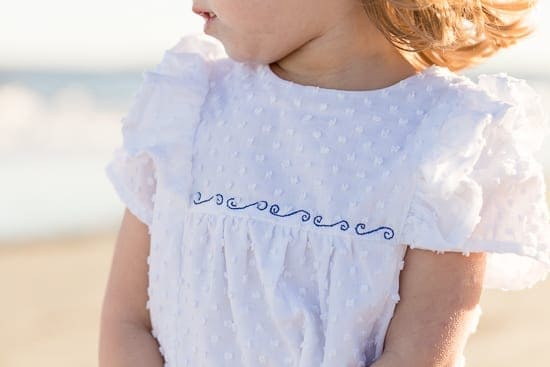
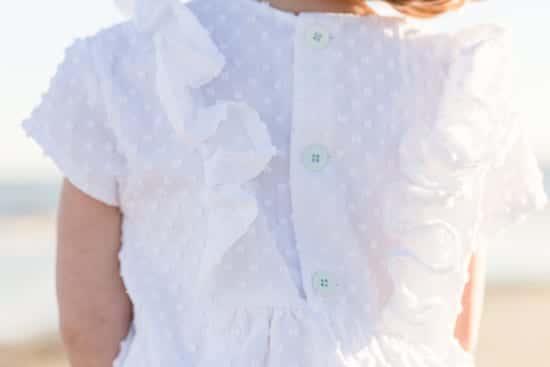
For the tunic I modified the hide and seek top bodice by shortening the front bodice piece from Oliver + S and added ruffles to the side seams.  It is made out a super soft white clip dot voile from Michael Miller.  It is a little sheer so I lined it with a white voile as well.  I added a Greek Style hand embroidered pattern to the front as well.  I also made a lace lined double skirt with a french terry knit from fabric.com on the top.  And of course added sea foam green mini pom trim to the bottom of the tunic that I bought on etsy.   My outfits really came together around the colors of the sea and represent the easy style of the Greek Isles.project-run-and-play

project-run-and-play-greek-isles

Kids Project Run and Play

Exciting News! I will be competing in Season 13 of Project Run & Play

Feb 28, 2017 · Leave a Comment

I am so excited to share this with you all.  The lovely ladies over at Simple Simon and Company who run Project Run & Play reached out to me and asked if I would like to be a contestant on Season 13 of Project Run & Play.  And of course since this has always been on my bucket list, I said yes (if you follow me on instagram, you may have already heard)!   In the last few weeks they have announced both the designers and the themes.  And let me tell you that I absolutely love this seasons themes and am excited to compete against some awesome designers.  It will be a tough competition for sure.  And the prizes are are amazing, so don’t forget to sew along!  I have started making some of my outfits and I cannot wait to share with you all next Tuesday on the first week of the competition.

I have so many sewing makes to share with you, but have been crazy busy trying to get my outfits for the competition together, the last time I sewed along with PR&P was when I made the dress my younger daughter is now wearing for the Winter Wonderland Challenge which I also made a tutorial for.   I promise I will share all my other sewing projects with you soon.  Including a few new quilts and tutorials.    I also got to travel up to Quiltcon East in Savannah and will share some of the beautiful quilts I saw there.  See you soon!

block party Project Run and Play

Free Heart Quilt Pattern – Easy Mini Heart Block Quilt Tutorial

Jan 30, 2017 · 2 Comments

mini-heart-quilt-block-tutorial-and-pattern-by-coral-and-co

Are you looking for some Valentine’s Day sewing projects? This mini Free Heart Quilt Pattern is the perfect quick holiday project.  You can make this quilt with this easy Heart Block Quilt Tutorial. heart-quilt-pattern

I really wanted to make a quilt with happy hearts for Valentines’s Day and of course, it needed some pink in it!  I decided my sewing wall could use a mini Heart Quilt in all my favorite colors.

 I think my inspiration actually came about a month or so ago when Cassie from Sew Stitching Happy posted this cute little bundle on instagram that had that cute little pink scrabble fabric from Amy Sinbaldi and some black and white fabric in it.  Then the heart block quilt tutorial was on its way.

And when I saw this Love text fabric I totally swooned.  It is totally the perfect backing fabric for any Heart Quilt Pattern or Valentines Day Quilt.   I really could put this on just about everything including these Valentine’s Day dresses.

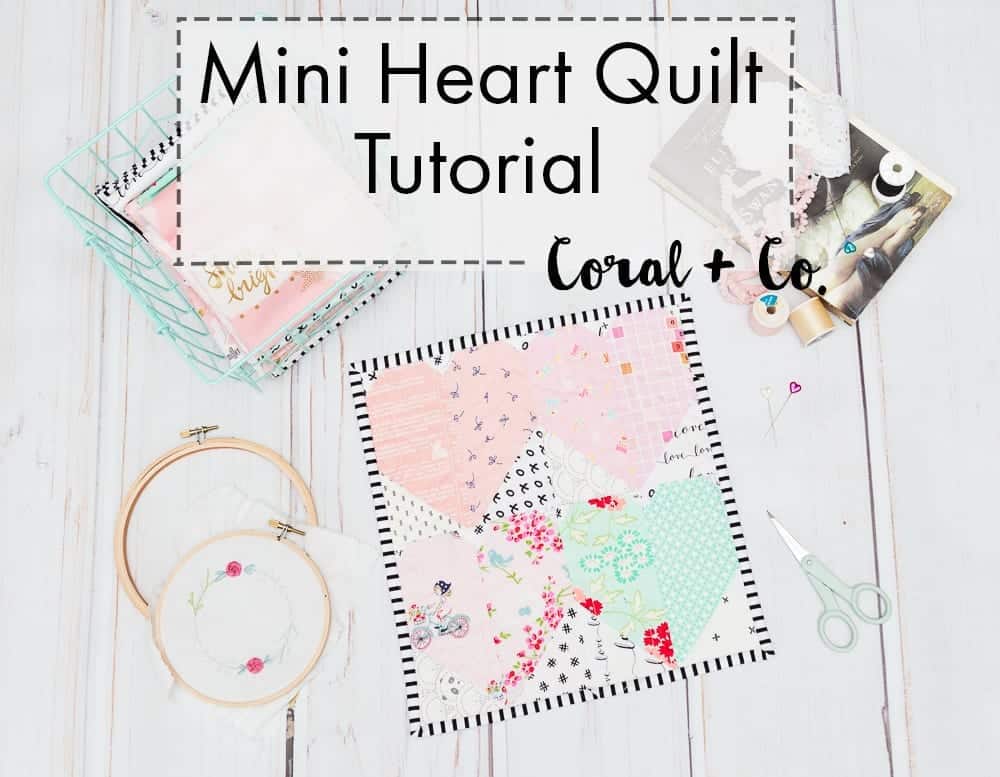
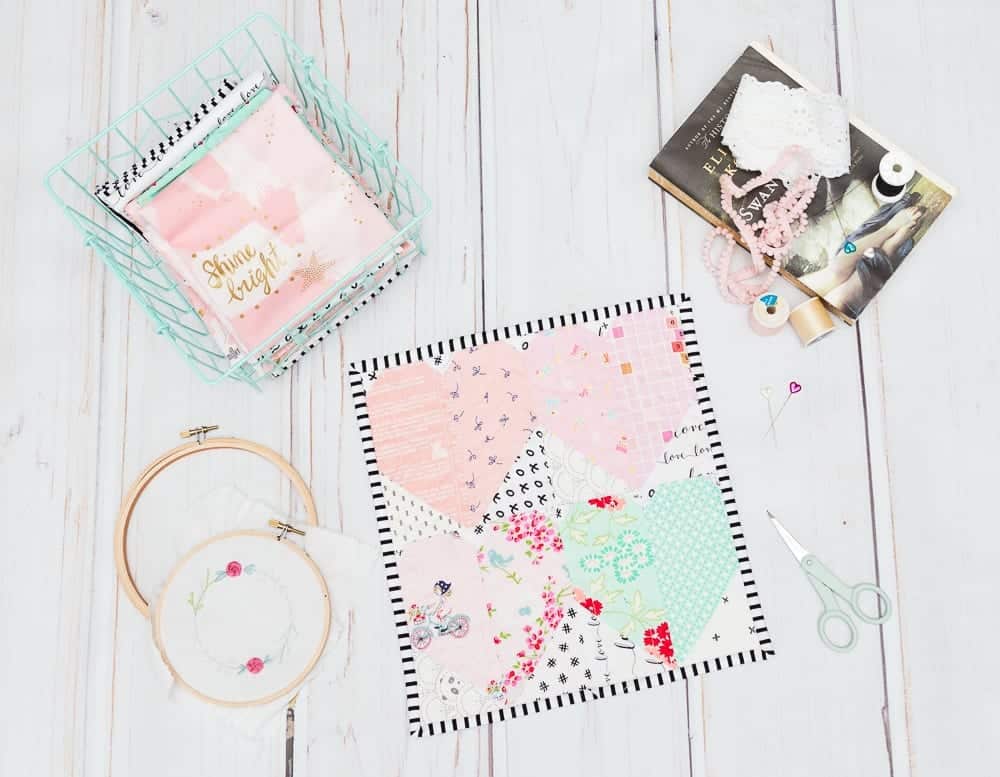
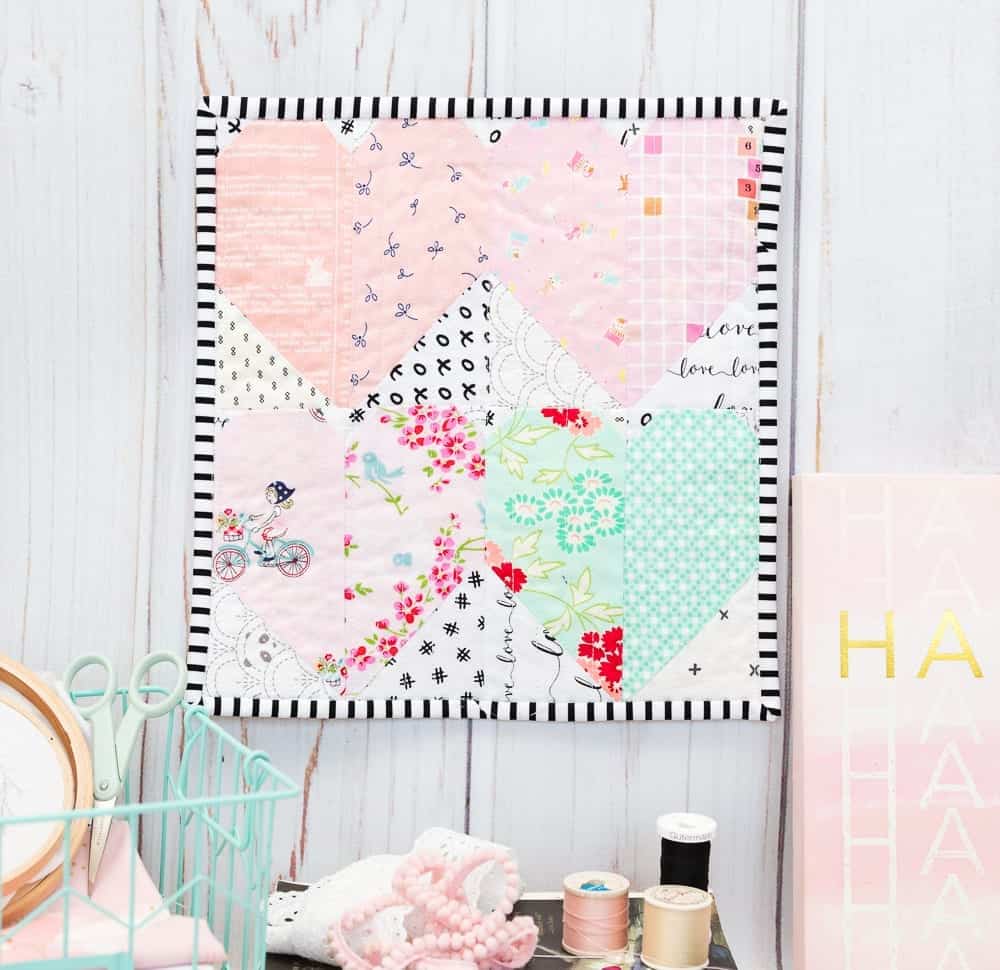
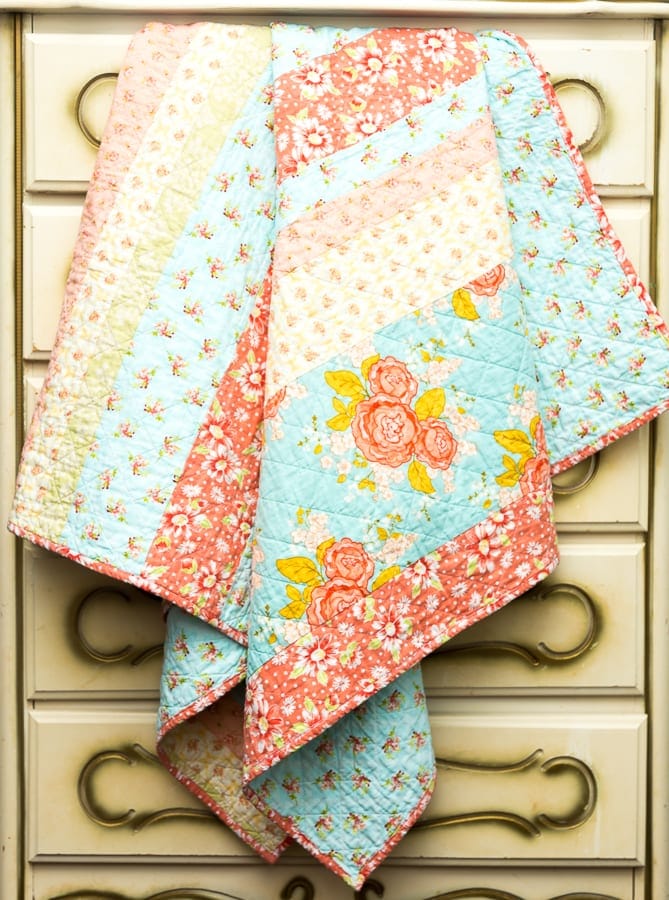
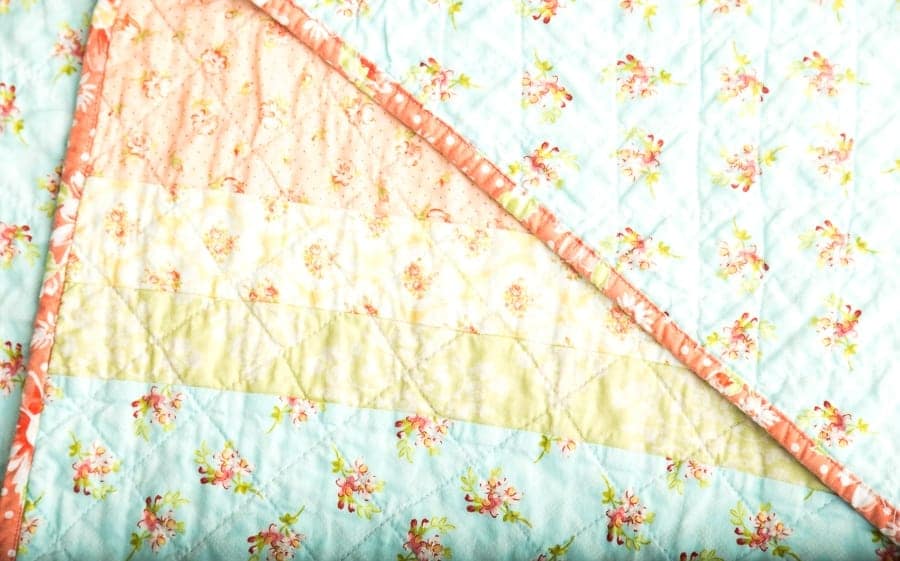
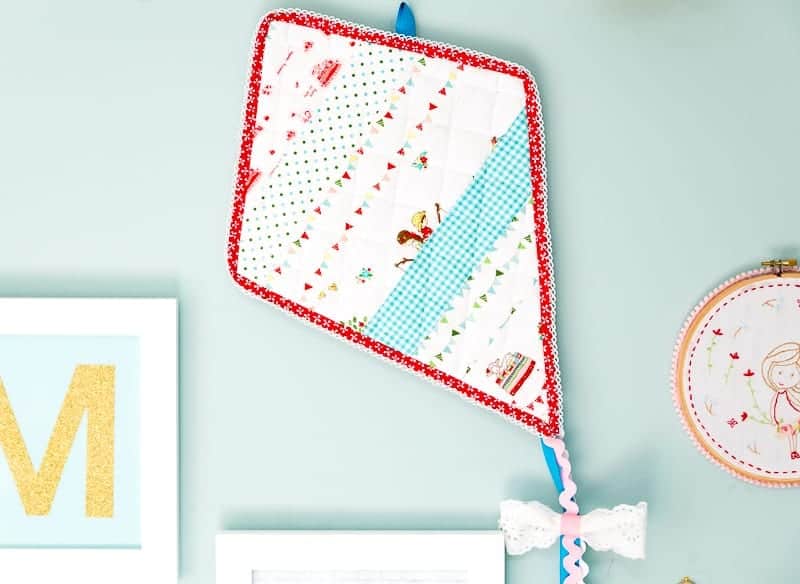
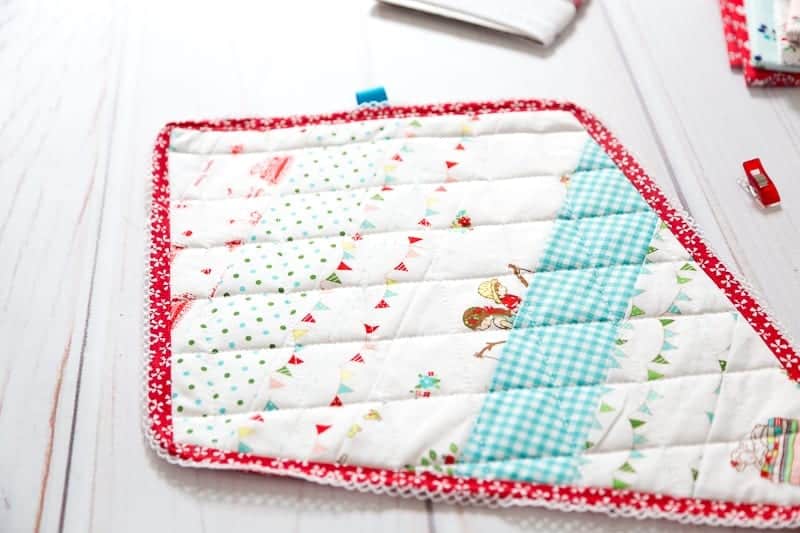
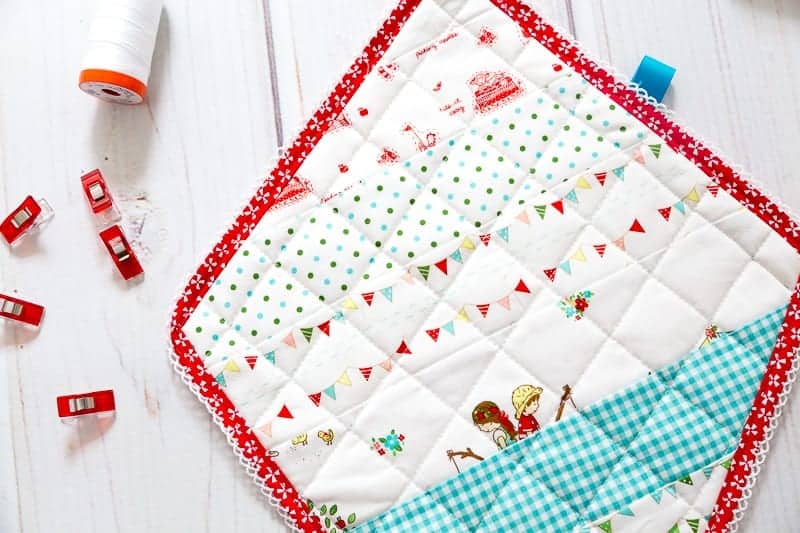
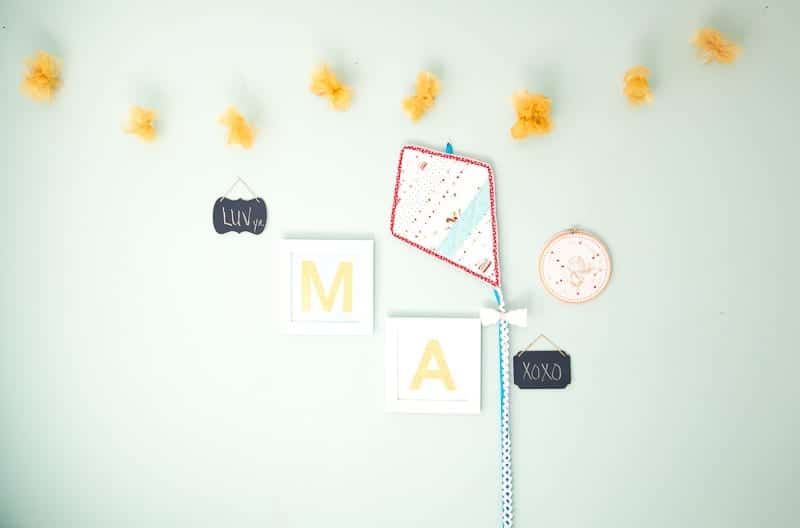
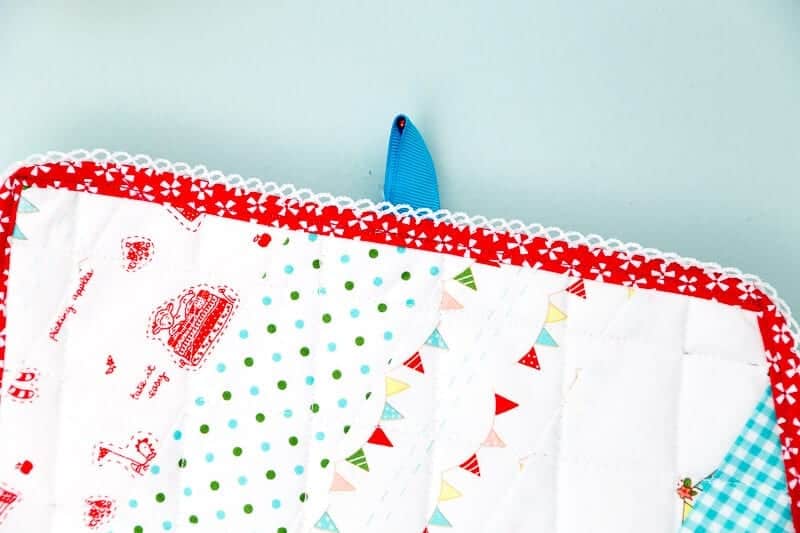
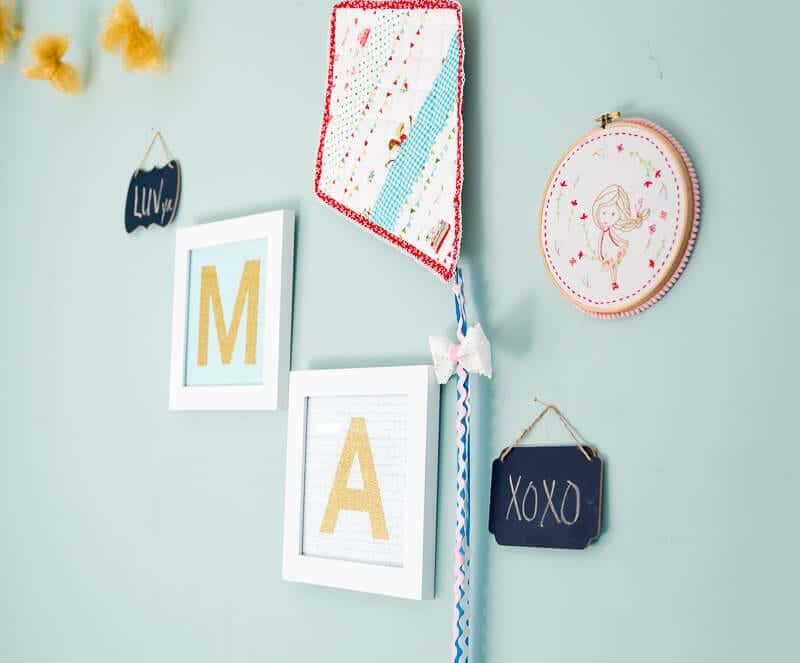
I also added some corner pockets on the back to hang it with.

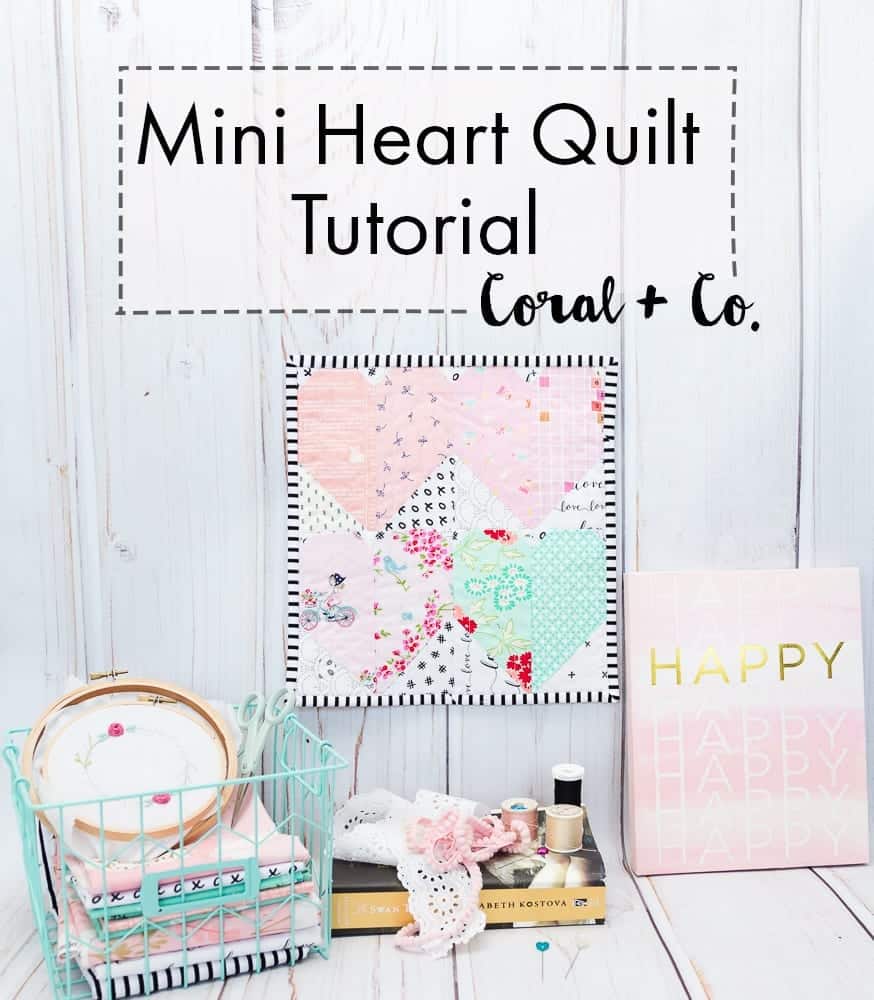
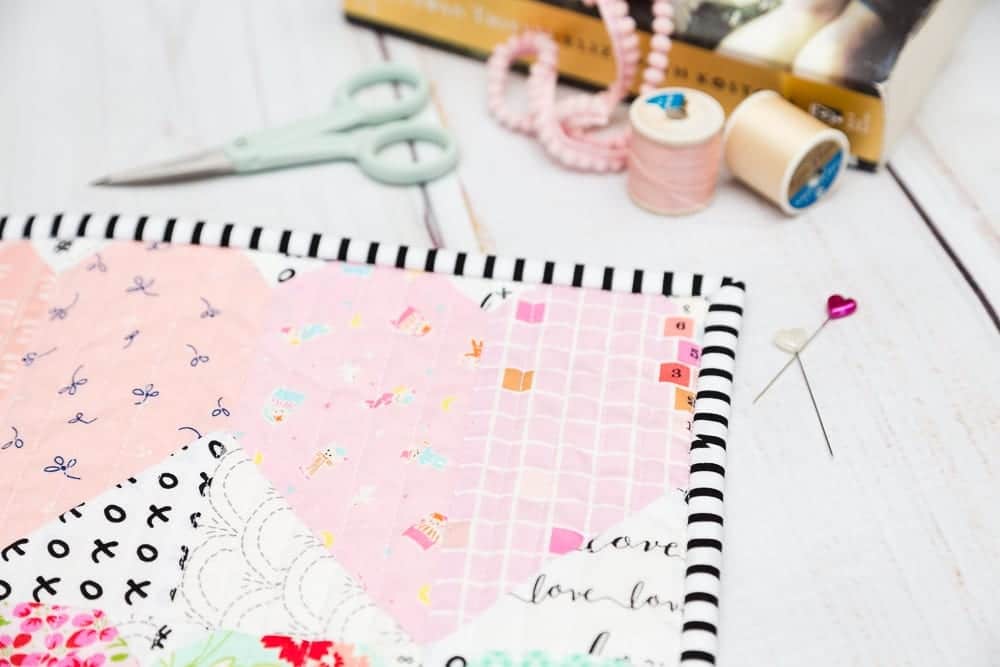
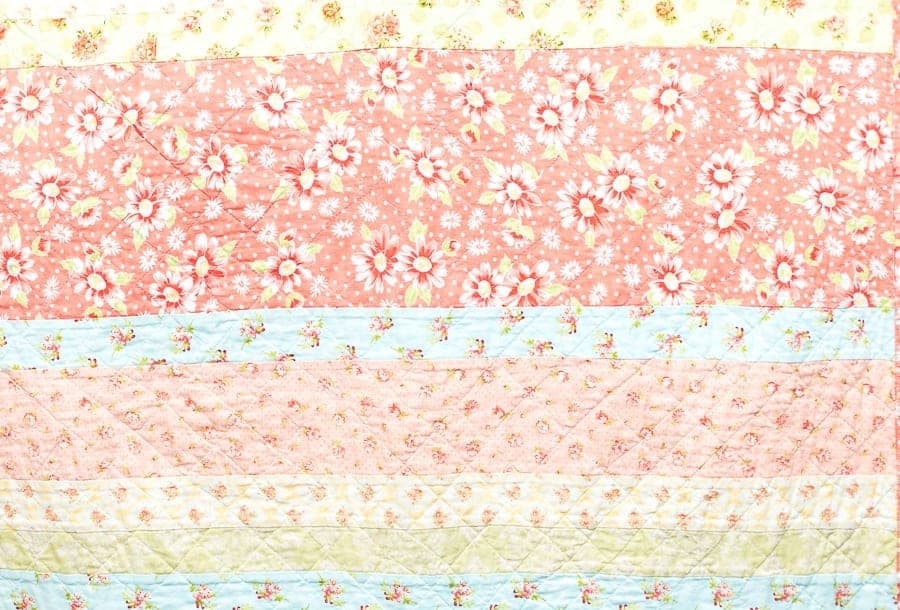
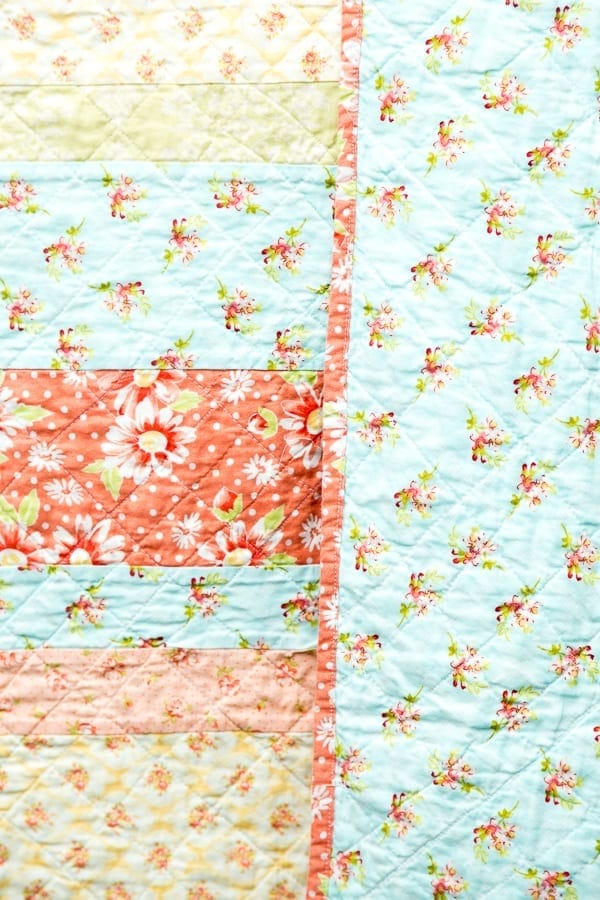
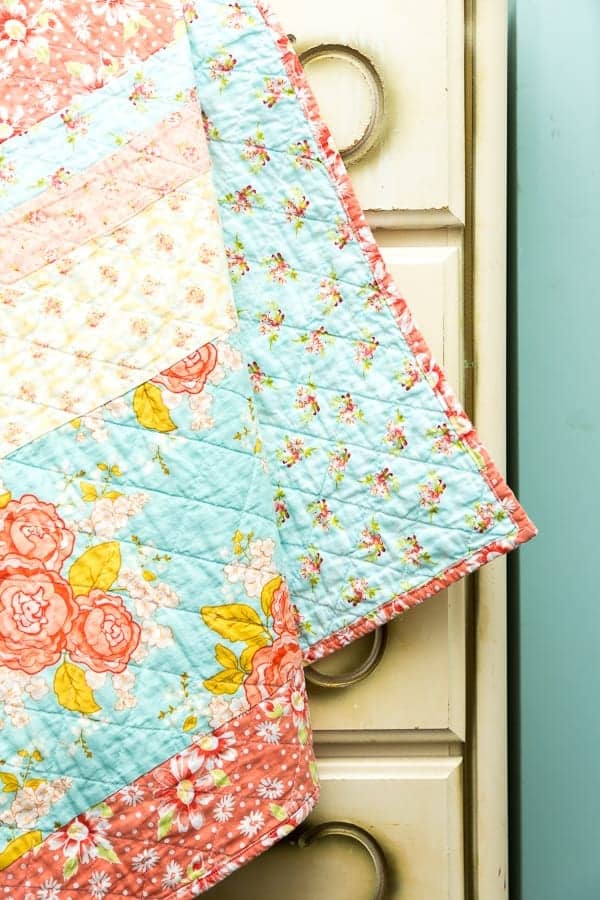
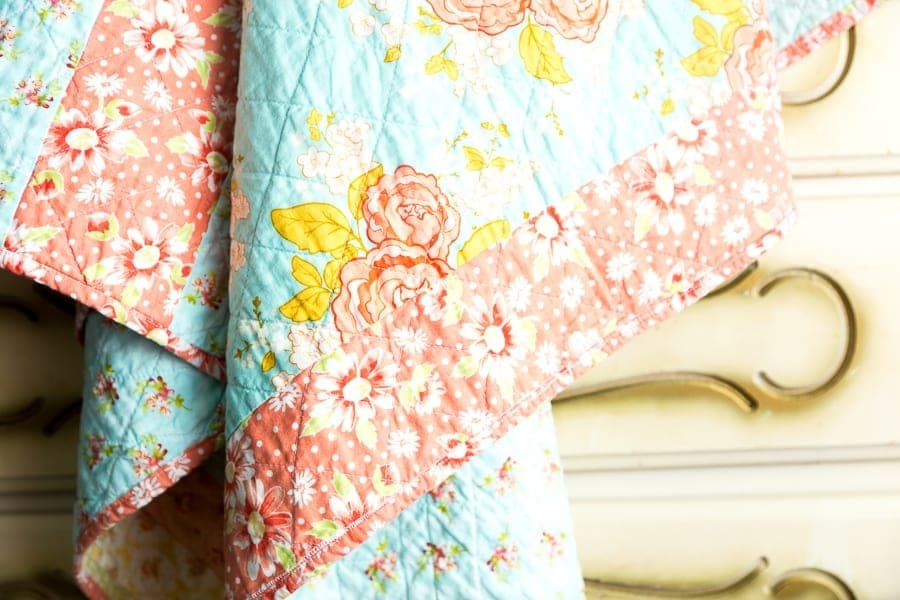
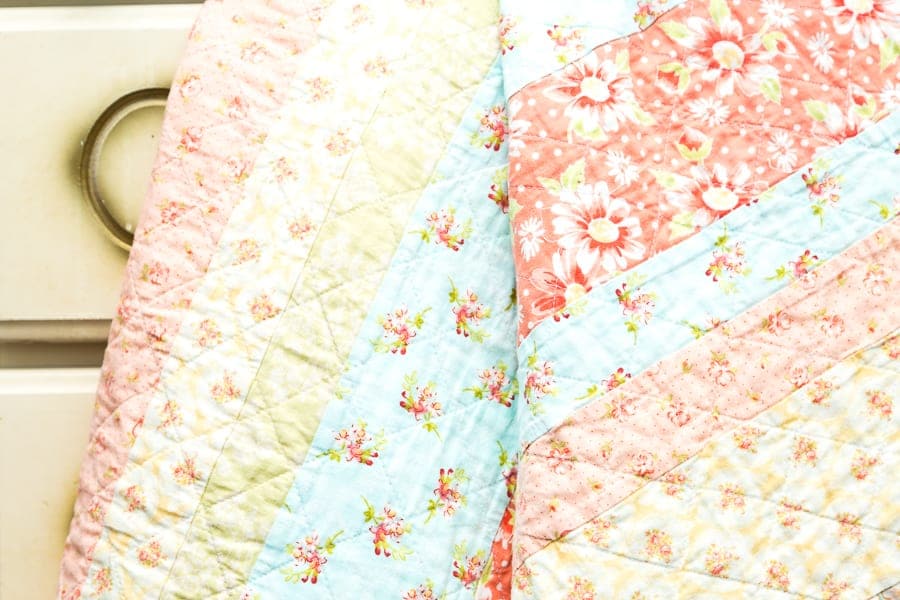
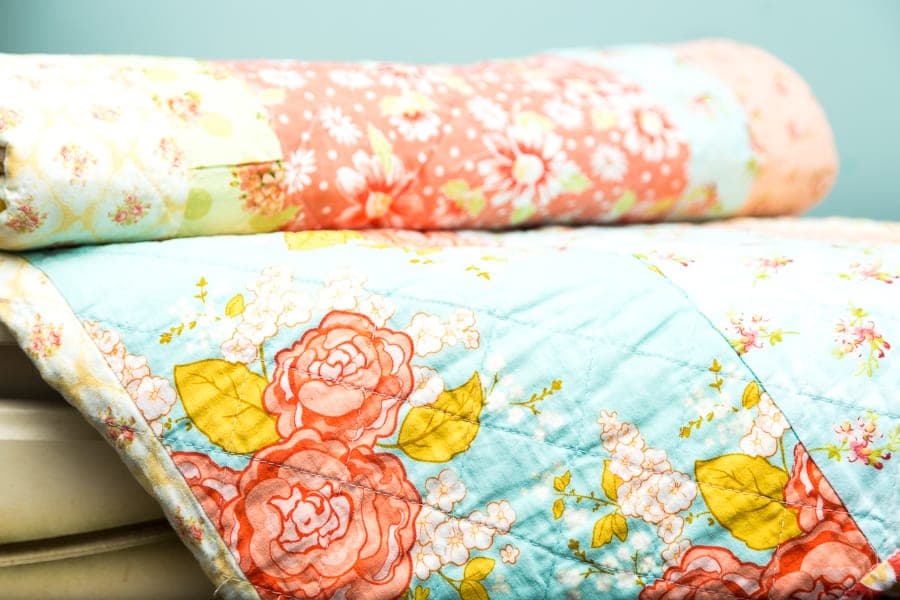
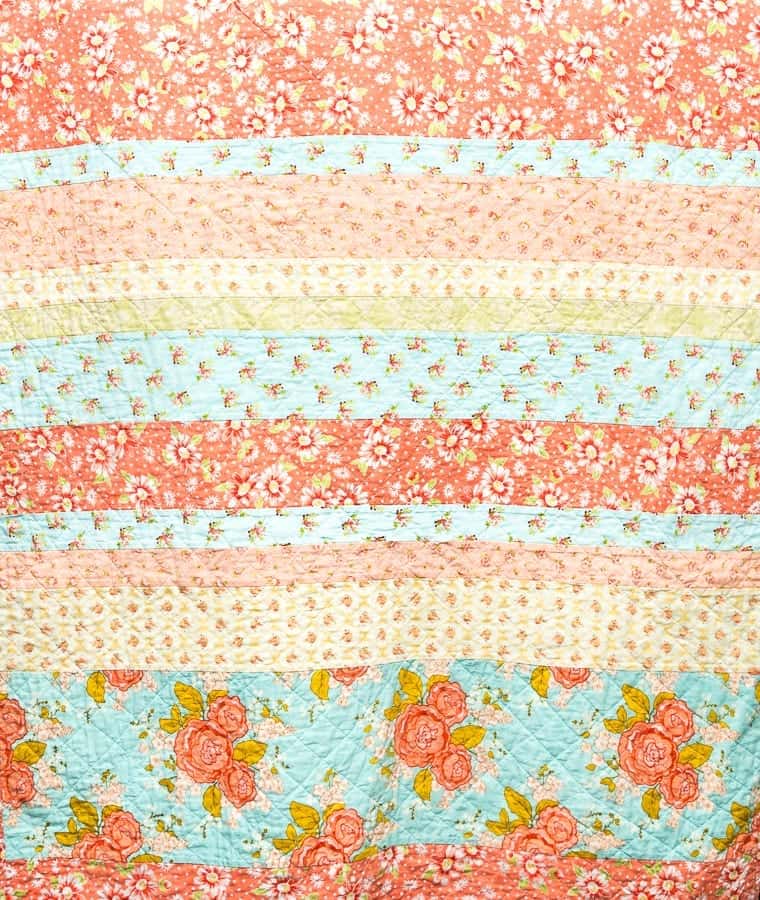
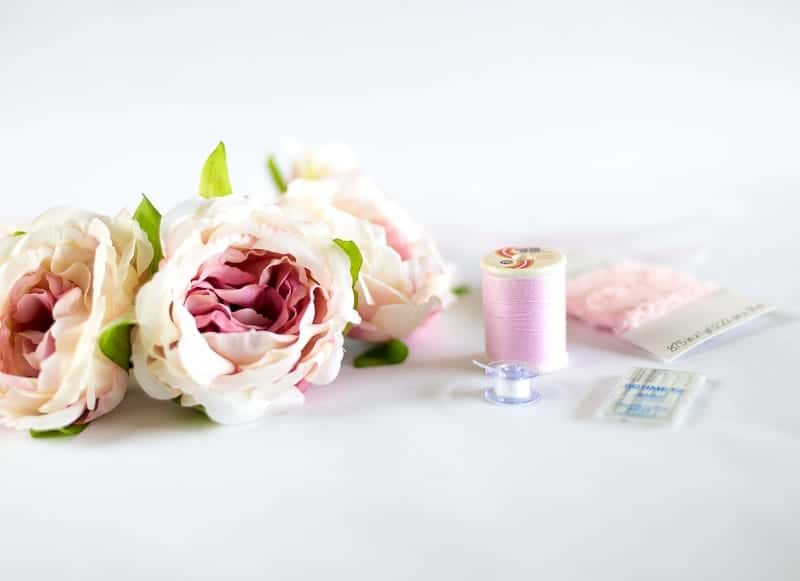
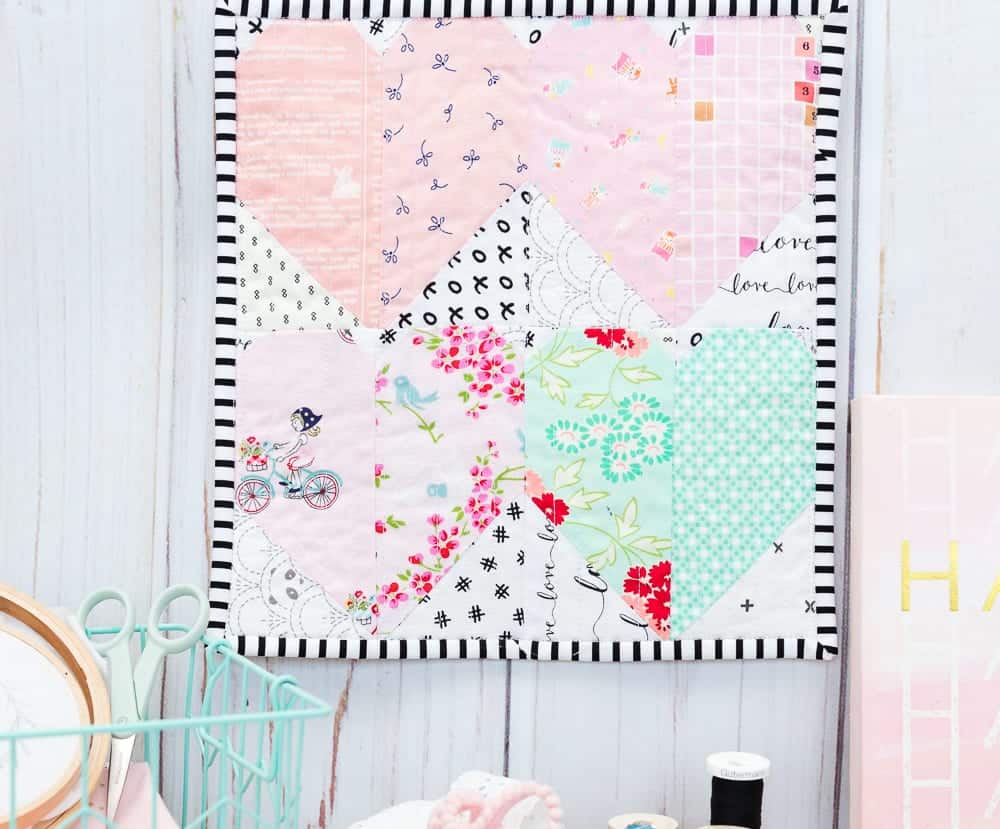
I love mixing all the shades of pink but my absolute favorite part is the pop of aqua.  But you probably already figured that out 😉

If you own a Cricut Maker check out this version of the Free Heart Quilt Pattern made just for the Cricut Maker.  With the Cricut Maker Quilt Pattern, all you have to do is upload the Cricut Quilt Pattern File and the machine will cut the fabric for you.  You can see how precisely it cuts in the video below.


Heart Block Quilt Tutorial Supplies Needed:

  1. (4) 10 x 10 scraps of fabric
  2. 1 fat quarter of background fabric
  3. 14 x 14 batting
  4. 14 x 14 backing fabric
  5. 1/4 yard binding fabric

Mini Free Heart Quilt Pattern

1.  Cut 8 Pieces 3.5” wide by 6.5” height

2.  Cut  16 Pieces 1.25” wide by 1.25” height

3.  Cut 8 Pieces 3.5” wide by 3.5” height

<

p style=”text-align: center;”>4.  Draw a diagonal line across both the
1.25” and 3.5” squares.

<

p style=”text-align: center;”>5.  Place 3.5” square over the large
rectangle with fabrics facing RST.  
Stitch down the diagonally drawn line to form the bottom of the heart block.

6.  Repeat for opposite side.

7.  Trim fabric 1/4” away from the seam.

8.  Open fabric and press flat.

<

p style=”text-align: center;”>9.  Place 1.25” squares on the top corners
with fabrics RST and sew down
diagonal lines as shown.

<

p style=”text-align: center;”>10.  Trim fabric 1/4” away from the seam
on both corners.

11.  Open fabric and press flat.

12.  Repeat for other side.  

<

p style=”text-align: center;”>13.  Place halfs of heart quilt block toghether
with RST.  Stitch using 1/4” from top of the block
to the bottom as shown below.  

<

p style=”text-align: center;”>14.  Open fabric and press flat.  
Repeat step 4 -13 for the remaining three blocks.

<

p style=”text-align: center;”>15.  Make a row of the heart quilt block by placing two blocks RST.  Stitch from
top of the heart quilt block to the bottom as shown below.

16.  Open blocks and press seam to one side to nest.

<

p style=”text-align: center;”>17.  To attach rows place top row over the bottom row
RST.  Make sure blocks are facing the correct
direction.  Sew the top edge from left to right using
1/4” seam.

18.  Open and press flat.

<

p style=”text-align: center;”>19. Make a quilt sandwich placing the backing fabric Wrong
Side Up.  Then place the batting on top of the backing.  Lay the quilt
top over that.  Be sure to cut the backing and batting 2 -3 inches
larger than the quilt top on all sides.

<

p style=”text-align: center;”>20.  Trim and square up the backing and batting to make
edges even with the quilt top.

<

p style=”text-align: center;”>21. Cut 2 Strips 2.5” wide by WOF.  Join edges diagonally to
form one long continuous strip.  Fold the strip in half lengthwise
and press.

<

p style=”text-align: center;”>22. Bind quilt and finish the ends using your favorite method.  
And you are all done!

Pin the Free Heart Quilt Pattern to make later!


If you like this project, you might also like the Quilted Heart Block Pillow Pattern.

Free Quilt Patterns, Holiday, Holiday, Quilt Patterns, Quilts, Valentines Day free quilt, mini quilt, quilt block, valentines day

A Calendar Project – January

Jan 11, 2017 · Leave a Comment


This year I decided to embark on a Calendar Project.  A What?  Every month for the whole year I will do a photo shoot with my girls using each month as a theme guide and at the end of a 12 month period I will have 12 beautiful photos for a calendar to give as a gift at Christmas.

I love this idea for several reasons.  The first is that I will get a chance to document how the girls change and grow over a 12 month period.  The second is that I will not be hustling at Christmas time to find 12 good pictures to put a Calendar together.

This project came about because for the past two or three years I keep saying that I will put together a calendar and give it to the grandparents.  But then Christmas gets here and with all the hustle and bustle, and parties, and holiday cooking, and everything else I never find the time to sort through the photos I have taken and find ones I like for each month. Okay maybe I am being particular and could just grab any old photos, but that wasn’t what I had imagined when giving a calendar, so I decided that just wouldn’t work.

The other part of it, is that I have spent the past few years working on taking better photos, my new camera has really made a difference in the quality my pictures, and I wanted to be able to display them in a beautiful Calendar.

I love all the different Calendar options that Shutterfly has available, especially the easel calendars and will probably get several different styles for Christmas presents.  This past Christmas I bought some beautiful Christmas cards, magnets, prints, and a mouse pad and loved them all.  They made some really heart warming gifts and I loved all the different products available to put photographs on.

For January I wanted to do something in the spirit of the New Year, so we went with what else but gold balloons!  And lots of them!  I think my husband thought I had lost my mind.  For the photo shoot Ava is wearing one of my very favorite dresses:  the Winter Wonderland Sweater Dress that I made for Project Run and Play sew along several seasons ago.  I loved pulling out this sweet dress and letting it shine again, since sooner or later even Ava will be too big to wear it.  Sniff.

It was warm that day so we took a few photos outside, but took the majority inside using my backdrop stand, seamless white paper, and my brand new studio lights (yay!)  Since I had carpet in my living room, I laid down a board under the paper to make it a firm surface.

I already have February’sphoto shoot planned out in my mind and can’t wait to see how it comes together!


block party Calendar Project

A Christmas Caroline Party Dress for Ava

Jan 4, 2017 · Leave a Comment

I made this cute little version of the Caroline Party Dress for Christmas for Ava this year and soooo had plans to post this for you all to see before Christmas.  But seriously, what mom doesn’t go completely bonkers during the Holiday season with the thousand things that we are supposed to get done.  There are parties, and presents to buy.  The kids are out of school so now not only can I not sew, but my house is a train wreck with animals hanging from the rafters.      

  <img src="http://static1.squarespace.com/static/56c5fed77c65e45e2d0cc7e6/56c5ffcee6515968572ed850/58657c3abebafb87e5392c82/1483045965386/The+Christmas+Caroline+Party+Dress+for+Ava.jpgThe+Christmas+Caroline+Party+Dress+for+Ava?format=original" alt=""/>

And then somehow I get the hair brained idea that I am going to MAKE gifts for people.  Seriously, what was I thinking?!!!  Uh, well, I guess what everyone of use sewing gals thinks.  And then I plan on somehow taking pictures and blogging about it.  Sheesh, I am totally wearing myself out thinking about it.  Which means I am probably wearing you out too, so enough of how my plans to get this dress sewn, photographed, and blogged before Christmas.

  <img src="http://static1.squarespace.com/static/56c5fed77c65e45e2d0cc7e6/56c5ffcee6515968572ed850/58657c64579fb393bb5d12ea/1483046021185/The+caroline+Party+Dress+from+Welcome+to+the+Mouse+House+%7C%7C+Coral+and+Co.jpgThe+caroline+Party+Dress+from+Welcome+to+the+Mouse+House+%7C%7C+Coral+and+Co?format=original" alt=""/>

As you can see that didn’t happen.  😉  However, I DID sew an adorable version of one of my very favorite party dress patterns.  The Caroline Party Dress Pattern is from Welcome to the Mouse House and has a great classic dress silhouette with cap sleeves that are part of the bodices (my fav kind because it makes it totally simple to sew) and a has a sweet peter pan collar, which I am totally a sucker for. 

  <img src="http://static1.squarespace.com/static/56c5fed77c65e45e2d0cc7e6/56c5ffcee6515968572ed850/58657cc2e6f2e17f4f082e74/1483046109180/Violet+Craft+Fabric+Christmas+Party+Dress+%7C%7C+Coral+and+Co.Violet+Craft+Fabric+Christmas+Party+Dress+%7C%7C+Coral+and+Co.?format=original" alt=""/>

And there is an option to add a layer of tulle underneath.  Which I will do next time for sure!  I didn’t snap any pictures of the back because it was getting dark and I only had a few minutes to take pictures.  There is an easy invisible zipper down the back (which is way easier than it sounds).  

  <img src="http://static1.squarespace.com/static/56c5fed77c65e45e2d0cc7e6/56c5ffcee6515968572ed850/58657cef197aea7b382fa554/1483046168361/Pink+Ivy+Floral+Crown+and+Christmas+Party+Dress+Sewing+Pattern+%7C%7C+Coral+%2B+Co.Pink+Ivy+Floral+Crown+and+Christmas+Party+Dress+Sewing+Pattern+%7C%7C+Coral+%2B+Co.?format=original" alt=""/>

Ok, so the details about my version of the dress.  I used a metallic flecked fabric from designer Violet Craft.   It has a whimiscal winter theme and purple of course!  Which made my munchkin happy.  For the collar I used a metallic gold houndstooth that was a super fun accent. 

  <img src="http://static1.squarespace.com/static/56c5fed77c65e45e2d0cc7e6/56c5ffcee6515968572ed850/58657d2f9de4bbc9c8659d67/1483046223006/Purple+and+Gold+Christmas+Party+Dress+Sewing+%7C%7C+Coral+%2B+Co.Purple+and+Gold+Christmas+Party+Dress+Sewing+%7C%7C+Coral+%2B+Co.?format=original" alt=""/>

My friend from Pink Ivy Floral lent us this floral crown and Christmas Wreath to take pictures with, which Ava was more than happy to do.  She pretty much flipped over the pink flowers.  And the lollipop!!!  Oh my cuteness, is from Hobby Lobby.  I actually wanted to make my whole house a Christmas Candy land when I saw the candy decor that they had there.  

  <img src="http://static1.squarespace.com/static/56c5fed77c65e45e2d0cc7e6/56c5ffcee6515968572ed850/58657d889f7456750f7affe7/1483046306422/The+Caroline+Party+Dress+Sewing+Pattern+%7C%7C+Coral+%2B+Co.The+Caroline+Party+Dress+Sewing+Pattern+%7C%7C+Coral+%2B+Co.?format=original" alt=""/>

I’m pretty happy with the way both the dress and pictures turned out and was able to use them for Christmas cards that I made over on Shutterfly.  Which is a triple win in my book!  Hope you all had a Merry Christmas and the happiest of holidays!

  <img src="http://static1.squarespace.com/static/56c5fed77c65e45e2d0cc7e6/56c5ffcee6515968572ed850/58657c9ab3db2b6bf258b9c8/1483046068627/Christmas+Party+Dress+Sewing+Pattern+%7C%7C+Coral+and+Co.Christmas+Party+Dress+Sewing+Pattern+%7C%7C+Coral+and+Co.?format=original" alt=""/>


  <img src="http://static1.squarespace.com/static/56c5fed77c65e45e2d0cc7e6/56c5ffcee6515968572ed850/58657dc8c534a540cf44fce4/1483046551918/Christmas+Dress+with+Michael+Miller+Fabric+%7C%7C+Coral+and+Co.Christmas+Dress+with+Michael+Miller+Fabric+%7C%7C+Coral+and+Co.?format=original" alt=""/>

Christmas, Holidays, Kids christmas

A Scrappy Shabby Chic Strip Quilt

Nov 15, 2016 · Leave a Comment

scrappy-shabby-chic-quilt

Wow, it has been quiet around here.  I didn’t mean to go so long without posting but between a secret sewing project (to be revealed later) and focusing on family, I took a little longer break than usual.

scrappy-shabby-chic-quilt

So I am happy that I am finally getting around to blogging this scrappy shabby chic strip quilt.  This quilt was one of those WIPs that went on for several years.


scrappy-shabby-chic-quilt-strip-quilt


In fact, I started it when my oldest girl was 2.  I finished it earlier this year but just hadn’t had a chance to snap some pictures.  I love all these florals that interact to give it a shabby chic look.

scrappy-shabby-chic--strip-quilt

When I started this quilt I was having an obsession with the lovely floral fabrics made by Fig Tree Quilts and found a lot of them at my local quilt shop, Broadway Quilts when I still lived in California.

shabby-chic-improv-quilt

If you have a chance to stop by, you really should!  Gerri, the owner has some of the best-curated fabric that I have EVER seen at a brick and mortar store.  I seriously drool whenever I am in there <3. Most of the collections are out of print, but you probably can find similar prints from current collections from the designers I mention below.

shabby-chic-quilt-tutorial

I didn’t follow a pattern for this quilt but instead took scraps that I had and then cut coordinating prints in various widths.  I backed it with a lovely blue floral print made by Henry Glass Fabrics ( I don’t know the actual designer).  The pink, coral, and yellow prints are all from Joanna Figueroa from Fig Tree Quilts made by Moda and are a combination of the Fresh Cottons, California Girl, and Strawberry Fields collections.

strip-quilt-tutorial

The Big strip of blue with the roses is called Marguerite from Riley Blake Designs, and is a print that I wish I had more of ( I definitely hoarded this piece for quite awhile)!  The finished measurements of the quilt are 45″ x 60″ and makes a great throw size, but if I had to do it again I would make it a little wider.

I quilted it with an organic crosshatch that doesn’t follow any rigid lines, that I think coordinates well with the scrappy look.

fabric-scrap-strip-quilt

I’m in the midst of sewing and quilting some Christmas gifts and will have a bunch of fun finishes to show you soon!  Emphasis on FINISHES, Ha.  I feel like that so rarely happens.

Quilt Patterns, Quilts quilting

Halloween Bag-a-Palooza Day 5 with Sunflower Seams and Lulu & Celeste

Oct 9, 2016 · Leave a Comment

DIY+Halloween+Treat+Bag+Tutorial+Halloween+Bag-A-Palooza+--+Sunflower+Seams

Today is the last day of the Halloween Bag-a-Palooza with Halloween Treat Bag Tutorials from Sunflower Seams and Lulu & Celeste.  If you read yesterday’s post you will have heard that I am little behind posting because of Hurricane Matthew.  We are hoping to head home tomorrow, but are still not allowed back due to the damage.  Luckily it seems that the Hurricane spared us the damage that was predicted.  Amen.

Like the rest of the Halloween Bag-a-Palooza bloggers these ladies do not disappoint!  I absolutely L.O.V.E. the Tutu Bag Tutorial from Sunflower Seams.  I mean what little girl doesn’t want a tutu Halloween Bag?  I’m pretty sure my girls would be fighting over this one.

And Ula from Lulu & Celeste put together a fast and simple Halloween Trick or Treat Bag Tutorial that has a nice boxy shape and that goes well with different contrasting prints.  And is the perfect size for little ones!


Halloween halloween

Halloween Bag-a-Palooza Day 4 with Pear Berry Lane and Sew and Tell Project

Oct 8, 2016 · Leave a Comment

Ok it is officially day 4 of the Halloween Bag-a-Palooza although you might have noticed that the schedule is a little bit off….

So you might have heard that there is a big hurricane barreling up the Atlantic coast.  You know, that new one named Matthew.  Yeah, well it decided to head straight for us, so we spent Wednesday deciding if we were going to evacuate and packing up.  And Thursday headed inland to a safe and dry hotel.  I thought all would be good once we got here but of course, since it is in the middle of nowhere it has kind of slow and spotty internet so it hasn’t been super easy for me to keep up the posting schedule.  But I’m trying 😉  We still don’t know exactly how much damage will be done or what to expect when we get back home but thankfully we are all safe and sound.

But meanwhile, the ladies who are part of the Halloween Bag-a-Palooza are killing it.  They have been whipping out some incredible Halloween Trick or Treat bags with some really unique ideas.  This tour has been a really fun way to take one concept and re-imagine it 10 different ways!candy-sorter-halloween-bag

Cassy from Pear berry Lane has an awesome DIY Candy Sorter inspired by Lego floor mats.  I love this idea!

I also love this spooky Kitty Cat Halloween Treat Bag made by Eleri from the Sew and Tell Project.   This would be a super fun bag for a little witch!

So many great ideas!  Check out other days of Halloween Bag-a-Palooza and come back tomorrow for one more day of Halloween Trick or Treat Bag Tutorials!


Halloween

Halloween Bag-a-Palooza Day 3 with Beatnik Kids and DIY Crush

Oct 5, 2016 · Leave a Comment

DIY-Halloween-Monster-Bag-Tutorial-by-beatnik-kids-at-coral-and-co

For Day 3 of the Halloween Bag-a-Palooza we link of Stacy of Beatnik Kids and Denise of DIY Crush and they have some awesome tutorials for you!!!!  I am totally loving these.

Stacy is rocking some classic Halloween monsters that are super fun and made with felt, so the kids and even join in. Go check out the DIY Felt Halloween Treat Bags from Beatnik Kids.

Denise from DIY Crush had the brilliant idea of recycling an old Halloween skirt.  I love this idea because there are lots of my kids handmade items that I don’t want to part with, but no longer fit.  You can see the Halloween Skirt to Bag Tutorial at DIY Crush.


Halloween halloween

Halloween Bag-a-Palooza Day 2 – A Tutorial and a Giveaway from Phat Quarters

Oct 4, 2016 · Leave a Comment

DIY-Halloween-Trick-or-Treat-Bag-Tutoirial

Welcome to Day 2 of the Halloween Bag-a-Palooza!  Today includes an Easy Trick or Treat Bag Tutorial I posted earlier today.  And, an awesome Halloween Fat Quarter Bundle Giveaway from Phat Quarters and a 30% Discount at the Phat Quarters Shop for the next 24 hours.  Go join Enter the Giveaway in the Halloween Fun!

DIY Halloween Trick or Treat Bag


Halloween halloween

Halloween Bag-a-Palooza Day 1 with Paisley Roots and Cindy Parrett

Oct 3, 2016 · Leave a Comment

Welcome to the Halloween Bag-a-Palooza, where 10 different fabulous sewing bloggers bring you 10 different Halloween Inspired Bag Tutorials.  We are super excited to share all of our Halloween bag tutorials and patterns with you and hope you get inspired!

First up is Karly from Paisley Roots.  You might know her from Project Run and Play a few season’s back.  I simply love Karly’s style of bold colors and geometric lines.  I never know what cool thing she is going to sew up next.  This week she has a Reversible Trick-or-Treat Bag Tote Pattern to get your Halloween sewing started.

Next up is the super cool Witches Hat Bag from the Cindy Parrett from the Cindy Parrett Blog.  What an absolutely adorable idea!!!!  Head on over and see this super cool Halloween Bag.

Come back tomorrow to see some more awesome bloggers and their Halloween inspired bags, all part of the Halloween Bag-a-Palooza!

Halloween halloween

DIY Fairy Costume Tutorial with Flowy Chiffon

Sep 20, 2016 · Leave a Comment

DIY-chiffon-fairy-dress-tutorial

DIY Fairy costume Tutorial with Flowy Chiffon

Today I have the cutest DIY Fairy Costume Tutorial made with a lovely flowy chiffon! I am so excited to share this one!!!! The idea came to me when I was scouting photography pictures on Pinterest. I loved the etherial soft backlit look with sweet pink tones. I wanted something that was light weight and would drape kinda flowy when the girls flitted about.

And I was kind of going through a flower crown obsession, so that had to be included. Like seriously, I was pinerest-aholic flower crown stalker! I finally decided on faux flower crowns because they cost serious dollazzz for just one real one. I also thought about making some from this cute flower crown tutorial and this one too. But since I was already making the dresses I decided to skip the DIY and buy them.

I had some left over Fairy Wings from the girls dance recital earlier this year, but I was seriously obsessing over these Rainbow Glitter Wings. I also these really cool wings on pinterest. If your thinking about doing your own DIY Fairy Photoshoot, Clickin Moms has some fun inspiration.

Fabric Needed:

1 yard  Chiffon Fabric 60″ width

1 yard jersey knit fabric or knit lining fabric for lining

1 package elastic ruffle trim

Fabric from from Fabric.com.  Affiliate links above.

DIY Fairy Costume Tutorial Steps

For the lining, place both pieces RST and sew using 1/2″ seam down both of the long sides.

Fold the fabric in half width wise (the long side), pin and sew from the top to bottom using a 1/2″ seam.

Then fold the short side of the fabric in half, so the wrong side of the fabric is facing each other.  Leave one edge 2 – 3 inches longer than the other like the picture below.

On the bottom raw edges pin to hold in place and baste both layers together along the bottom edge to hold fabric together.

On the folded side on the top, gather the entire length using your favorite method.

Insert the lining inside the chiffon, lining up the gathered edge with the lining top.  Baste both layers together to hold in place.

Overlap the ends of the elastic by 1″ and sew together.   Then fold elastic in half and mark or pin at 1/4 intervals (in 4 places) all the way around.

Stretch elastic out around the dress lining up marked places on the elastic with the dress sides and front middle and back middle.  Zigzag stitch the elastic to the dress stretching elastic gently as you go.

To find the length of the elastic shoulder straps, measure from under the front underarm, over the shoulder to the back underarm.  Subtract and inch and this is your length.  Cut 2 of these.  Then pin elastic in place to the front and back sides of the inside of the dress overlapping chest elastic by 1/2″.  Zigzag stitch in place, being sure to do a straight back stitch at the beginning and end.

You are all done!  Go fly and be merry!

Free Tutorials, Halloween, Holiday, Kids, Sewing halloween, kids

Knot Bow Romper Tester Roundup and Giveaway Winner

Aug 22, 2016 · Leave a Comment

knot-bow-romper-tester-photos

Whew what a summer!  My kids are finally back in school and I am so excited to have a chance to catch up with everybody again.  I really had planned on blogging through the summer, but with the kids around all the time it just got too difficult and I decided to quit ripping my hair out trying to find time to sew and instead just enjoy the time with the kids and go have fun swimming and hanging out at the beach.

So with out further ado, I have all the wonderful versions of the Knot Bow Romper sewn up by my wonderful testers.  I feel so lucky that this wonderful group of ladies took time to sew and photograph their adorable Knot Bow Rompers.  And how cute are all these fabrics?!!!

How fun are these rainbow stripes made by Jennifer Lipscomb

I just can’t get over how awesome all these Knot Bow Romper’s are!  I was so lucky to work with such a wonderful group of testers.  I’ve included social links where you can support and find out more about the ladies who made these looks, many of who run handmade businesses.  Click the image to be taken to their facebook page.

You can find the FREE Knot Bow Romper Pattern here.

The Fabricworm Giveaway Winner!

a Rafflecopter giveaway

Free Patterns, Kids, Sewing knits, summer

Flutterby Kite – Reach for the Sky + One Thimble Magazine Issue 12

Aug 18, 2016 · Leave a Comment

flutterby-kite-sewing-pattern-tasha-noel-fabric

OMG, I am totally gushing over this seriously cute Flutterby Kite pattern from Molly and Mama for One Thimble Issue 12.  I mean fur reals!  A quilted kite up on my kiddos wall!  What?!!!  Anyways, it is totally love.

If you don’t know what One Thimble is, it is a totally cool digital e-zine that has exclusive patterns that come out in each edition.  And I am seriously crushing over the patterns in volume 12.  There are some gorgeous dresses and tops.  And even a beautiful woman’s skirt that I totally want to make.kite-quilt-pattern-flutterby-kite-pattern-coral-and-co-molly-and-mama

If you’ve been following along on Instagram you have seen that I have been (slowly) working on a quilt for my daughter’s bed.  I used some of my favorite fabric from my stash, Tasha Noel’s The Simple Life jelly rolls.  This collection is all sold out, but you can find her current one here  I had some mostly white strips left over from the quilt, so I thought it would be really cute to have a coordinating look on the wall.  Its kind of a low volume look, but I think the red trim really makes it POP, especially against the minty walls!kite-quilt-pattern-flutterby-kite-pattern-coral-and-co-molly-and-mama


The pattern originally called for narrower strips, but I had slightly larger jelly roll strips and I didn’t want to lose the illustrated scenes so I just went them the the size that they were.kite-quilt-pattern-flutterby-kite-pattern-coral-and-co-molly-and-mama


I also added some cute hoop art to the wall with this whimsical embroidery pattern from Tamir Nahir.  She has beautiful patterns in her shop.   I can’t decide which ones I like the best so I think I will be adding a few more to the wall.kite-quilt-pattern-flutterby-kite-pattern-coral-and-co-molly-and-mama


And the trim!  Oh my goodness I am totally CRAZY over the cute little pinwheels, which totally look like they were made for this fabric!  I got them from Vintage Door on etsy and seriously want Every. Single. One. in their shop.  The picot edge just makes me deliriously happy.  I mean who doesn’t want to wrap themselves in crochet edge bias binding, amiright?!kite-quilt-pattern-flutterby-kite-pattern-coral-and-co-molly-and-mama


I made a bow at the end of the kite with some vintage lace that I had in my stash that I previously used on there shorts.


kite-quilt-pattern-flutterby-kite-pattern-coral-and-co-molly-and-mama

I made gold tulle pom pom garland used clear invisible thread to string them together.

kite-quilt-pattern-flutterby-kite-pattern-coral-and-co-molly-and-mama

I really like the texture that the crosshatching added so I decided to go with that look as opposed to stitching in the ditch because of the mostly white fabric.

kite-quilt-pattern-flutterby-kite-pattern-coral-and-co-molly-and-mama

And if you have a chance check out Molly and Mama, these are simply some of the sweetest sewing patterns I have seen.  You can find the Flutteryby Kite Pattern in her etsy shop.

kite-quilt-pattern-flutterby-kite-pattern-coral-and-co-molly-and-mama

The Flutterby Kite pattern added the option of adding a ribbon or hanging pocket to the top but  I wanted to hand the kite on an angle to add interest, so I added a ribbon on the side.

kite-quilt-pattern-flutterby-kite-pattern-coral-and-co-molly-and-mama

And the ribbon and ric-rack trim!  It definitely adds a fun dimension.    And our new kitten thinks that I hung up a new toy just for him!

kite-quilt-pattern-flutterby-kite-pattern-coral-and-co-molly-and-mama


Flutterby Kite Pattern Available Here

One Thimble Issue 12 Now Available


Check out the blog tour to see some of the other inspiring looks made from One Thimble Issue 12.  I promise you will love them!


8/12
Call Ajaire
Bunch O Berries
Sew Happily Ever After
 
8/13
Once Upon a Sewing Machine
Tales of a Tester
All Things Katy
 
8/14
House Of Estrela
Sun Flower Seams
Stitches by Laura
 
8/15
That’s Sew Kari
Coral and Co.
Threading Rainbows
 
8/16
Lulu and Celeste
Max California
Pearberry Lane
 
8/17
Sprouting JJ
Create Three Point Five
Made By Melli
 
8/18
Snickerdoodle Stew
Beri Bee Designs
Candice Ayala
Sew Sophie Lynn
 
8/19
Pattern Revolution
Adventures with Bubba and Bug
Made by Sara

***Post contains affiliate links.

Kids, Quilts home

  • « Go to Previous Page
  • Page 1
  • Interim pages omitted …
  • Page 13
  • Page 14
  • Page 15
  • Page 16
  • Page 17
  • Page 18
  • Go to Next Page »

Primary Sidebar

  • Home
  • Blog
  • About
  • Featured Elsewhere
  • Contact

Copyright © 2026 Coral + Co. on the Seasoned Pro Theme