
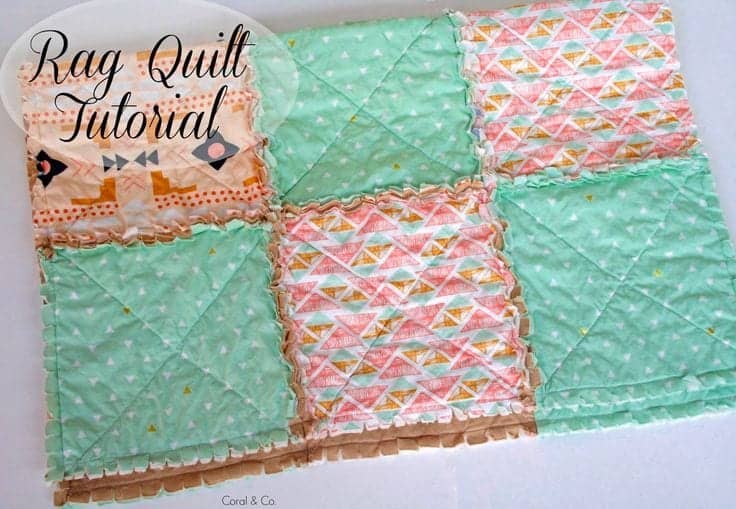
Are you in a hurry to make a quilt? If you answered YES then this DIY Rag Quilt Tutorial is for you! It's crazy simple and fail-free, they always come out cute and make the best gift for anyone of any age! I made a baby sized quilt with a modern touch 35x26 inches, you can add more squares and make it as big as you want.
WHAT YOU NEED:
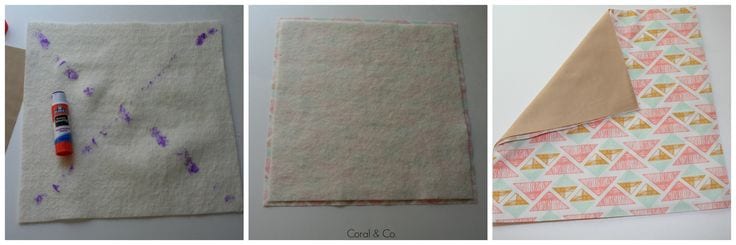
12 - 10 inch squares of Heirloom Quilt Batting (my favorite because it puckers)
12 - 10.5 inch squares of cotton fabric for the front
12 - 10.5 inch squares of cotton fabric for the back
Pencil
Glue Stick
Self-healing Cutting Mat
Scissors
Here is the DIY Rag Quilt Tutorial:
Here are my squares!!!! I used cotton fabric in Arizona by April Rhodes.
1)Now it's time to sandwich your squares together. I like to use stick glue on everything when I sew, it washes right out and does a great job at keeping your fabric from slipping while sewing. Glue the front to your batting square then glue the back to your batting square. You will be able to see the right side of your fabric, if you see the ugly side facing up try again. Do this to all of your squares.
*Tip - You can also use flannel for batting on rag quilt.
*** Check out these MUST HAVE TIPS FOR SEWING WITH FLANNEL
2) I always draw a line to make sure I'm sewing straight. Take your ruler and draw an X on all of your squares.
3) Sew right on top of your pencil lines. Sew all 12 squares together.
4) Now figure out how you want your quilt to look. Play around with your squares and put them in the order you want them in.
5) Start sewing your squares together using a 1/2 inch seam allowance. Sew them together in rows until you have 3 rows. See the picture below, you WANT the ugly seam to be on top of your quilt. Notice the seam ripper in this shot? 🙂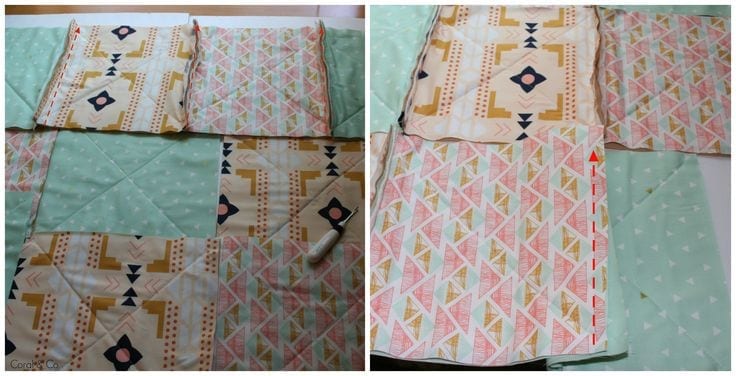
6) Sew your 3 rows together. It might be hard for your machine to sew through all of this fabric, it'll make it easier if you open the seams while sewing so it ends up going through less fabric. Using a new needle will help tremendously.
7) Now sew all the way around your entire quilt using a 1/2 inch seam allowance.
8) Now for the fun part! Cut notches on all of the flipped up seams and the outer edges. Cut a notch every 1/2 inch or so. DO NOT cut into your stitches. Be careful. *
These are the BEST scissors ever! They can cut through wire.
9) Inspect your quilt for loose strings and make sure all of the flipped up seams are not bunched up.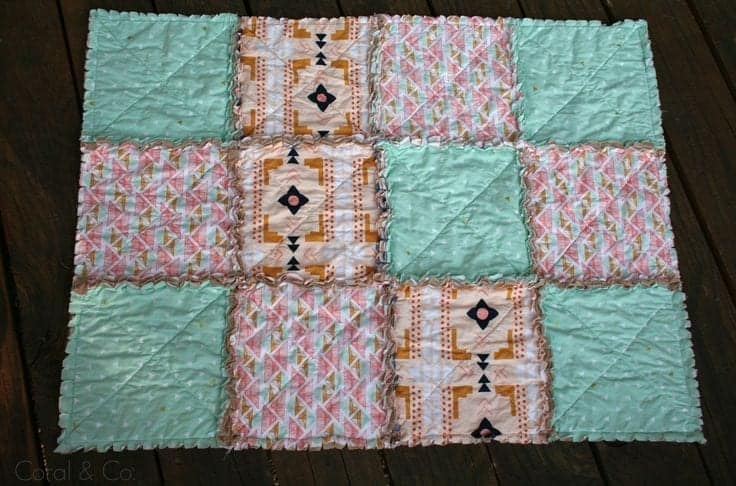
10) Now for the best part. WASH IT!!!!!!! DRY IT!!!! And now you have your Rag Quilt made from this easy DIY Rag Quilt Tutorial!
Let me know what you think! Do you have any questions? Just ask.
Thank you,
Jennie
I'm very interested in making this quilt. Just wonder if I'm understanding place quilt back glue onto batting. Place quilt square top onto batting and glue. You quilt by seeing the X you have drawn correct then see squares together. Thanks Pat Eatmon
Lovely! And a super way to show off all the all the memories of quilts gone by. I make a quilt for each couple in the family for their wedding shower. Then I have the scraps left over for a baby quilt and now I think your pattern is perfect for the baby quilt.
I also like these scissors for rag quilts. Less fatigue. https://tinyurl.com/y3okkdwy
Thanks for sharing this.
I had a rush order for a baby quilt. I ended up embroidery on my embroidery machine one of the 3 colors of flannel that I purchased. I did everything you describe in the tutorial. When I washed it, it came out FULL of lint and pilling. This was good flannel from Joann's and not cheap fabric. I tried washing and drying it again and that made it worse. I spent 3 hours picking each little bit of fuzz balls off of it. I was afraid to give it as a gift for a new baby, since a new mother certainly doesn't have the time to be pulling pilling balls off of it. Now I am making the same quilt with t-shirt fabric and I will not be ragging this one.
After three or four washes there is very little lint and it gets softer and fluffier. Everyone loves them. Just tell new Mom to wash separately for the first few washes.
I was wondering if you could use pinking shears to cut around the squares before you sew them together, thus not having to do all that clipping? Just curious!
No. You want the edges to fray. When you wash it you will get LOTS of little pieces of the thread in the dryer, but that is what makes the quilt so nice. The seams are all soft and fluffy.
No pinking shears will stop them from fraying which is what you want.
I thought it was actually a video of making a rag quilt. I need to watch and here people speaking.
When you say... See the awards together.... do you bring all the seam allowance to the top and have 4 layers to stitch through and avoid the batting?
Yes. Looks kind of unfinished until you wash it and the seams all fluff up.
Will it matter if there are a few squares 1/4'' narrower than the others? I would be dividing the difference on two sides of the square to 1/8" on each side. There would be just the seam and snipping that would be affected and I really don't think the difference will show once it is frayed. This is for a gift, so I don't want it to look bad or fall apart.
Thanks for any help you can give me with this.